How To Make A Grilled Cheese in The Microwave?
For the Best Grilled Cheese, Start in the Microwave
- Microwave your grilled cheese sandwiches for a low effort, yet highly customizable approach that turns out a perfect grilled cheese sandwich every time.
- Simply place the sandwich in the microwave and heat until the cheese is fully melted and starts oozing at the edges.
- This method ensures the cheese reaches that ooey gooey stage, while a quick final toast in the skillet can add that golden brown, toasted bread texture, making it a heavenly treat on those busy days.
- As a grilled cheese expert, I find this to be the ultimate go-to meal when you want something delicious without much fuss.
My Ammu Helped Me Discover This Smart Trick
- My Ammu (the Bangla term for mother), introduced me to making my first grilled cheese sandwich in the microwave during my elementary school years.
- She would place American cheese between slices of sandwich bread, then microwave it before finishing it on the stove with a skillet to get that superb, crispy exterior.
- This microwaved grilled cheese sandwich not only cut down on cook time but also ensured that each bite was perfectly devoured at dinner, creating fond memories of home-cooked meals straight from the cafeteria to our kitchen.
Why do I Always Microwave My Grilled Cheese Sandwich?

My Secret to the Perfectly Melted Grilled Cheese
As someone who has experimented with countless Grilled cheese recipes over the years, I’ve learned that cooking the grilled cheese in a microwave before finishing it off on the skillet is not just a hack; it’s a game changer.
This method ensures the cheese is 100% melted, and it does so uniformly, preventing those unwanted burns that often happen when the bread toasts too quickly on high heat.
Starting low and slow in the microwave allows the heat to pass through the bread, softening it up so the cheese starts to melt perfectly without any resistance.
Then, a quick sear on the skillet gives that desirable crispy exterior. Not only does this reduce the cooking time to less than five minutes, but it also keeps this simple dish from becoming a burnt disappointment.
This reform in technique makes all the difference in achieving a sandwich that’s both toasted to perfection and gloriously gooey inside.
Ingredient Notes

- Butter: Preferably use softened butter or a butter-like spread to ensure easy spreading on bread.
- Bread: Sandwich bread like sliced sandwich bread is ideal for maximum convenience. Options include white bread and wheat.
- Cheese slices: Opt for Kraft slice singles or any packaged sliced cheese. It’s handy to pick and choose based on what’s on hand without worrying about specific ingredients or measurements typically found on a recipe card.
Crafting the Perfect Microwaved Grilled Cheese
- Assemble your sandwich using either Classic White Wonder Bread, Private Selection’s specialty bread, or Wegmans Sourdough Sandwich Bread. For the cheese, I typically go for Kraft Singles American Cheese or a slice of block cheese like pepper jack for that extra kick.
- Place the assembled sandwich on a microwave-safe plate. Set your microwave to high power and heat the sandwich for 40 seconds to one minute, depending on the thickness of your bread and the cheese used. This helps the cheese start to melt nicely around the sides.
- To avoid a soggy outcome from trapped steam, you should not let the microwaved sandwich sit on the plate where steam can accumulate. Instead, quickly transfer it to a preheated skillet (preferably cast iron) on medium-high heat. Make sure to butter the bread first for that golden, toasted finish.
- Place the microwaved sandwich in the skillet, plate-side facing up to let any release from the sandwich. Flip it after one to two minutes on each side to ensure it is evenly toasted.
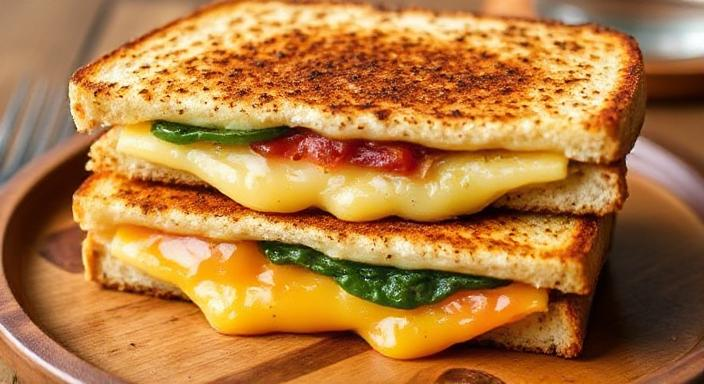
- Once done, cut the sandwich diagonally. Serve immediately to enjoy a perfect grilled cheese sandwich that’s crispy on the outside with melted, gooey cheese on the inside.
Why This Recipe Works
The Beauty of a Simple Sandwich Recipe
One of the reasons this simple sandwich recipe for grilled cheeses stands out is its undeniable low cost and accessibility. Unlike Sandwich meat or fancy condiments, which can be pricey, you only need a slice of cheese and some butter—ingredients that are likely already in your fridge.
Swapping the cheese for your favorite variety allows for easy customization, turning it into one of your favorite sandwich recipes. This method skips the stovetop, making it a million times faster than traditional cooking methods, and still delivers a delicious meal that can satisfy the entire family.
Whether it’s alongside Grilled Fluffernutters, Spicy Tuna Sandwiches, or Frozen Peanut Butter and Jelly Sandwiches, this grilled cheese proves that great taste doesn’t require complexity or high costs, making it quick to make and perfect for any meal.
🧾 Substitutions
- Cheese: While Kraft slice singles are common, any sliced cheese can be used to customize the sandwich.
- Bread Variety: Beyond standard sliced sandwich bread, any type of bread can be chosen based on your taste preferences.
- Butter/Mayo: Though butter is standard, mayo can be used for spreading on the outside of the bread to create a crispy, flavorful crust when grilled.
🍴 Recipe Tips
For an Enhanced Texture in your grilled cheese, consider wrapping the sandwich in a paper towel before microwaving. This technique helps to absorb any excess moisture, ensuring that your sandwich maintains a firmer texture and helps to retain its crispness.
This small step makes a big difference, especially when you’re aiming for that perfect microwaved grilled cheese.
🥗 Side Dishes

When serving your grilled cheese sandwich, pairing it with the right side dishes can elevate this simple lunch to a more satisfying meal.
Consider easy options like potato chips, fresh fruits, or cut vegetables that you might have on hand. Strawberries and grapes make for a delightful contrast with the warm, melty cheese, adding a burst of freshness to your meal.
Using a Toaster
- Toast two slices of bread in a toaster until they reach a golden brown color. Use medium or middle setting on the dial to avoid under-toasted or too crisp and drier results, as you want to retain some moisture in the bread to avoid making the sandwich too soggy.
- Butter one side of each slice of toast. This will be the outside of the sandwich, helping to seal in moisture and prevent the bread from becoming steamed and too soft.
- Place your cheese between the slices of toast, on the dry, unbuttered side of the bread. Use between 3/4oz and 1.5oz of cheese in total, ensuring it is evenly distributed across the bread. You might need to tear the slices into smaller pieces to better fit and pile them on the sandwich.
- To prevent the sandwich from becoming too soggy, wrap it in a paper towel to absorb any excess moisture. Then, place the wrapped sandwich on a microwave-safe plate or rack.
- Microwave the sandwich for about 15-20 seconds on high. This time may vary depending on your microwave and the amount of cheese used. The cheese should start to drip down the sides of the sandwich when it’s done.
- After microwaving, use a towel or oven mitts to remove the sandwich and let it sit for 2-3 minutes before serving. This allows the bread time to cool slightly, making the crust safer to eat.
Conclusion:
Creating a grilled cheese in the microwave is a quick and easy way to enjoy this classic comfort food with minimal effort. Begin by toasting the bread slightly to enhance its texture and prevent sogginess. Apply a thin layer of butter on the outside to achieve a crispy exterior.
Layer your choice of cheese between the bread, ensuring it’s evenly distributed. For best results, wrap the sandwich in a paper towel to absorb excess moisture, then microwave it briefly until the cheese is perfectly melted.
This method not only simplifies the cooking process but also delivers a deliciously warm and gooey grilled cheese sandwich in just minutes, making it an ideal solution for a quick lunch or snack.
People also ask
Can You Microwave a Grilled Cheese?
Microwaving a grilled cheese can be a quick alternative to the traditional skillet method, especially when time is short. The key is to ensure the cheese is 100% melted within the sandwich, achieving that gooey consistency we all love.
Although you won’t get the same toasted texture as from a skillet, you can reduce the cooking time to less than five minutes. For best results, briefly heat the sandwich in the microwave to melt the cheese, then transfer it to a hot skillet for a minute or two to crisp up the bread.
Can You Toast a Sandwich in the Microwave?
Toasting a sandwich in the microwave is not ideal due to the trapped steam which can make the sandwich wet and sticky. However, a workaround is to microwave the sandwich just until the cheese begins to melt, then quickly cook it on a skillet for one to two minutes per side to achieve a toasted finish.
This method helps to evade the soggy texture typical of a purely microwaved sandwich. After skillet toasting, cut the sandwich diagonally for that visually appealing, perfect grilled cheese sandwich.
How Do You Melt Sandwich Cheese in the Microwave?
To properly melt cheese in a sandwich using a microwave, first assemble your sandwich with your choice of fillings between two slices of standard sandwich bread. Place it on a microwave-safe plate.
The timing and power setting are crucial: set your microwave to high and heat for 40 seconds to one minute, depending on the thickness of the bread and the amount of cheese. Check to ensure the cheese is melted around the sides for an evenly cooked result.
How to Heat a Sandwich in the Microwave?
Heating a sandwich that’s gone cold, especially if it’s been in the refrigerator, requires a gentler approach. Place the sandwich in a foil bag if possible, to retain moisture and prevent it from drying out. Heat on 50% power for about 90 seconds.
If it’s just slightly cool and needs a quick warm-up, 30 seconds on high should suffice. Microwave times will vary, so use common sense to adjust the time based on how warm you want your sandwich.