

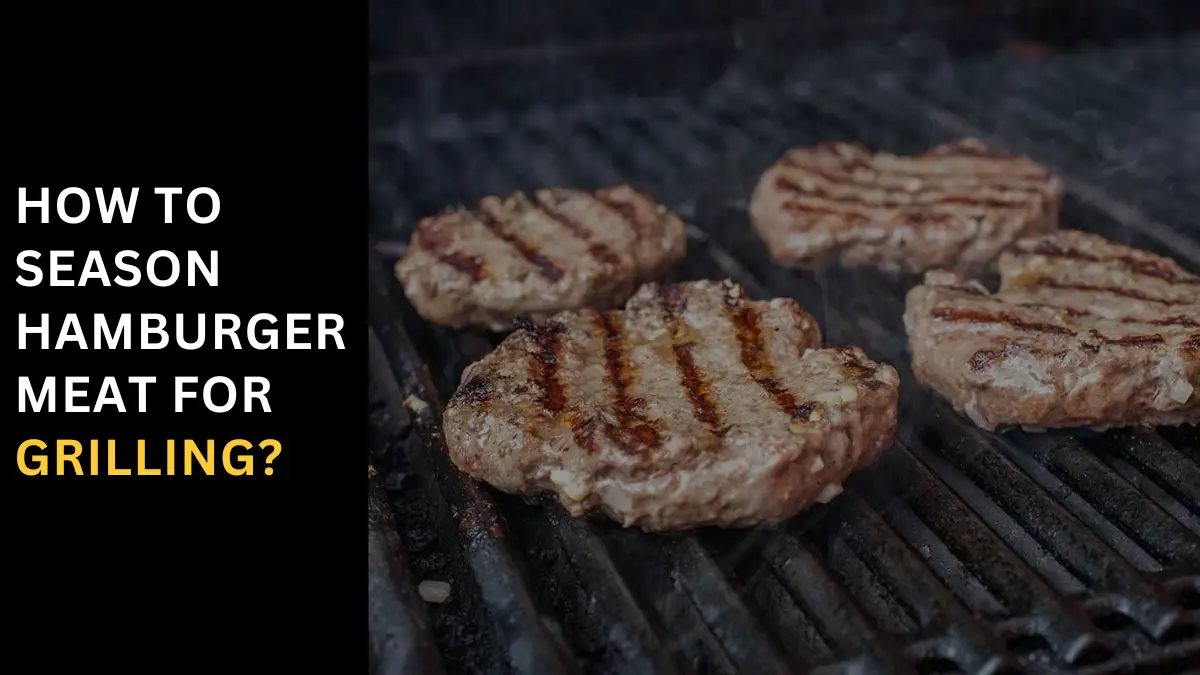
How To Season Hamburger Meat For Grilling? Hamburger Seasoning When it comes to grilling, the secret to a perfect hamburger lies in the seasoning. From my kitchen adventures, I’ve learned that the best hamburger patties are those seasoned with a mix of simple ingredients from your pantry. Crafting the best batch by hand ensures that each patty is infused with flavor and ready for the grill. What Goes In a Hamburger Seasoning Recipe? The foundation of a great hamburger seasoning mix starts with pantry staples. A little bit of creativity goes a long way, combining paprika, brown sugar, onion powder, salt, black pepper, garlic powder, cumin, and a dash of cayenne pepper. This blend is a game-changer, infusing the meat with a depth of flavor that is simply irresistible. How To Season Burgers? To season your burgers, thoroughly mix these seasonings and store them in an airtight container. They can last up to six months, ensuring you always have enough for about 9 pounds of hamburger meat – perfect for a big grilling out session. This amount can yield up to 36 hamburgers. Use about one tablespoon to rub on each side of the hamburger patties. I typically use 1 pound of 80/20 ground chuck for four burgers, making sure they’re indented in the middle for the best grilling results. The brown sugar in the mix helps to crisp up the outside of the burger, imparting a great flavor and a deliciously delicious finish. Turkey Burgers: A Seasoning Twist Now, for those wondering about turkey burgers, yes, you can use the same seasoning mix. The recipe I shared works wonders on turkey as well, lending a robust flavor that complements its leaner profile. Just remember, whether it’s beef or turkey, a good seasoning rub is what makes a burger truly memorable. What to Serve with Grilled Hamburgers Grilled Corn: The Perfect Side Dish When it comes to serving the perfect side for Grilled Hamburgers, my favorite has always been Grilled Corn. This side dish pairs wonderfully with the smoky flavors of grilling, elevating the humble corn to perfection. In my recent post, I shared how to achieve that perfect charred goodness that has everyone at the BBQ raving. Arugula Salad: A Fresh Twist Another side dish I’ve been obsessing over is Arugula Salad, inspired by a recent recipe. With just five ingredients, it brings a fresh, peppery contrast to the rich flavors of hamburgers. Its simplicity and burst of flavor are sure to make your guests come back for seconds. Strawberry Spinach Salad: A Popular Choice For a sweeter touch, Strawberry Spinach Salad is a popular and delicious choice. Its easy preparation and vibrant dressing complement the hearty hamburgers, adding a burst of freshness to your grilling menu. Greek Pasta Salad: A Hearty Addition Lastly, don’t underestimate the power of a good Greek Pasta Salad. It blends leafy greens with pasta, creating a hearty yet refreshing side that perfectly balances out the meal. How Much Burger Seasoning Per Pound? When it comes to burger seasoning, the magic ratio I’ve found is 1 tablespoon per pound of hamburger. This ensures each bite is flavorful without overpowering the natural taste of the meat. Hamburger Seasoning with Worcestershire Enhancing Burgers with a Savory Twist Incorporating Worcestershire sauce into your burgers can significantly enhance their flavor, adding a savory umami depth that’s hard to match. It’s not always necessary, but it aligns well with personal taste preferences. For those who enjoy a rich, deep taste in their hamburgers, a splash of Worcestershire can be a game-changer. Classic Burger Seasoning: A Sunset Magazine Recipe For a Classic Burger, I often turn to a Recipe from Sunset Magazine. In a bowl, mix ground beef, an egg, finely chopped onion, bread crumbs, a dash of Worcestershire, minced garlic, 1/2 teaspoon salt, and 1/4 teaspoon pepper until well blended. Divide the mixture into four equal portions and shape each into a patty about 4 inches wide. This method ensures each burger is packed with classic, harmonious flavors. McCormick Hamburger Seasoning Recipe When using McCormick Grill Mates Hamburger Seasoning, which is a blend of 24 oz of SALT, TOASTED ONION, SPICES, BLACK PEPPER, CHILI PEPPER, RED BELL PEPPER, SUGAR, GARLIC, GRILL FLAVOR, SUNFLOWER OIL, and NATURAL FLAVOR, you’re ensuring a well-rounded, robust taste. It’s a reliable choice for those who prefer a pre-made mix, offering a consistent and delicious flavor to your hamburgers. Conclusion In conclusion, the art of seasoning hamburger meat for grilling is a balance of simplicity and creativity. Whether you’re opting for the classic salt and pepper combo, experimenting with a blend of spices, or integrating the seasoning directly into the meat, each technique offers its unique contribution to the flavor profile of your burgers. Remember, the key to a memorable burger lies not just in the quality of the meat, but in how you season it. So next time you fire up the grill, embrace these methods and watch as your burgers transform into juicy, flavorful masterpieces that delight your taste buds and impress your guests. People also ask How do you season burgers before grilling? Sprinkling the Perfect Blend For Beef burgers, a simple sprinkle of salt, preferably kosher salt, and black pepper is often enough to make them juicy and delicious. But don’t be afraid to branch out with other hamburger-friendly seasonings like mixed herbs, spices, or even finely minced onions for an added layer of flavor. What can I add to hamburger meat for flavor? In a small bowl, combine 1 tsp of sweet paprika, ½ tsp of smoked paprika, garlic powder, onion powder, ¼ tsp of freshly cracked pepper, ⅛ tsp of cayenne pepper, and ½ tsp salt. Stir these spices together, and they’re ready to use, promising to deliver the juiciest, most flavorful burger experience. Should you mix seasoning into burgers? When you mix the seasoning into the burger meat, you integrate the flavors throughout. Instead of just adding it on the outside, mixing it in ensures each bite
Grilling Magic – Top Secret to Tender Beef Stew Meat
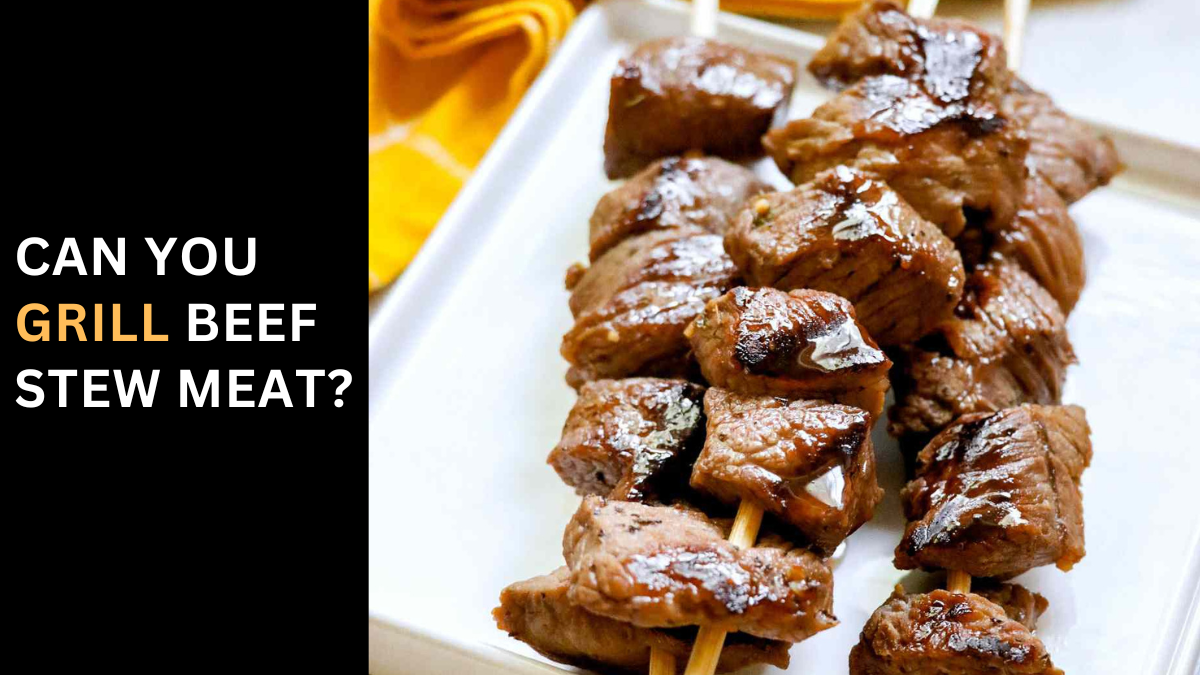
Can You Grill Beef Stew Meat? Perfectly Tender Steak Bites Grilling beef stew meat can seem like a culinary adventure, reminiscent of the books we read as a kid. The key lies in choosing the right recipe and having the necessary tools and knowledge at your disposal. Creating flavorful, effortlessly cooked steak bites in mere minutes is easier than it sounds. It’s all about selecting meat perfectly suited for a quick, seared experience on the skillet or grill. The Art of Selecting Steak Tips When browsing the butcher’s section, you might find steak tips and steak bites used interchangeably. These tender cubes of steak often come from the trimming of larger cuts of beef. While regions of the country may have different meanings for these terms, the packaging should list the exact cuts you’re about to purchase. Opting for cubed stew meat is the usual route for those who relish the slow and low cooking session. To properly tenderize it, a general rule is that it should be cooked raw. The cost of steak tips is similar to sirloin steaks, and they’re probably among the more fairly tender cuts of beef. However, cheaper options like chuck roast can be tough. These cubes are better left for stews, where they can soften over time. In my experience, the transformation of beef stew meat into steak bites is a delightful surprise. As someone who’s grilled everything from sirloin to chuck, I’ve learned that the right preparation can turn even the most unlikely ingredients into a star on the dinner table. Whether it’s a family dinner or a solo meal, the result is a dish that’s as satisfying as it is simple. How to Cook Steak Bites Cooking steak bites is one of the easiest meals to cook. These quickly seared, high-heat wonders develop a flavorful crust on the exterior while keeping the inside just pink enough to ensure tenderness. For those who prefer their meat well-done, it’s completely feasible with a bit more cooking time. beef steak on a mini grill pan served with fried potatoes, and fresh salad. Start by heating your skillet and add 1-2 tablespoons of oil to help create that crisp, final texture. Place the bites in the skillet, ensuring the bottom is sufficiently seared before you flip to another side. While you might aim to sear 2 sides, getting all 4 sides typically leads to overcooked meat. Remember, the secret lies in balancing high heat with quick action, making steak bites not just delicious but also a quick culinary adventure. Shortly Explain A Quick Recipe of Grill Beef Stew Meat Ingredients Directions First, season the meat with Greek seasoning. Secondly, in a large, resealable bag or nonreactive bowl, combine corn syrup, soy sauce, garlic, and seasoned salt. Massage the blend, then add the beef, pressing out the air and sealing the bag. Let it marinate for 24 hours, flipping occasionally to ensure the flavors are absorbed evenly. When ready to cook, Preheat the grill to medium heat and lightly oil the grate. Thread the beef cubes on skewers and grill on the preheated grill, turning until they’ve reached your desired degree of doneness. Tips for Grilling Steak Bites When grilling steak bites, especially those with a high sugar content like in sweet marinades, be careful of the flames. These bites can darken quickly due to the sugar, so there’s a worry of burning them if the grill is too high. Monitoring and adjusting the heat is key to achieving that perfect sear without charring the meat. Nutrition Facts (per serving) Steak Seasoning Instead of a marinade, steak seasoning can be a game-changer. Whether you use a rub recipe you found online or purchase your favorite blend from the store, the timing of its application is crucial. It’s best applied a few hours before cooking, allowing the flavors to penetrate the meat. This method is similar to marinating but with a focus on creating a crust of herbs and spices that enhances the natural taste of the steak. My go-to involves a blend of coarse salt, cracked black pepper, and a hint of smoked paprika – simple, yet transformative. Sweet Grilled Steak Bites This recipe for grilled steak bites brings a slightly sweet flavor that’s enough to be noticeable but not overpowering, pleasing people who enjoy a twist on the ordinary. These marinated cubes of steak, perfect for a roast on an open flame, can be cooked kabob-style. The Prep Time is about 15 mins, and the Cook Time varies, but the Additional Time for marination is 1 day, making the Total Time approximately 1 day 30 mins. This amount serves about 6 people, yielding 2 pounds of delicious steak bites. Conclusion In conclusion, grilling beef stew meat is not only possible but can be a delightful culinary adventure. While this cut of meat is traditionally used for slow cooking methods like stewing, with proper preparation such as tenderizing and marinating, it can be transformed into succulent grilled delights. Techniques like quick searing over high heat, utilizing marinades or rubs for flavor enhancement, and being mindful of cooking times can elevate stew meat from a humble stew ingredient to a star of the grill. Whether you’re making kebabs, steak bites, or simply grilling cubed meat, beef stew meat offers a versatile and flavorful option for your next barbecue session. People also ask Is Stew Meat Good for Grilling? Yes, stew meat, often pre-cut into kabob pieces, is perfect for grilling. In my full confession as a grilling enthusiast, to make it more palatable, it’s crucial to tenderize. Once thawed, use a meat tenderizer with blades that make cuts against the grain of the meat, breaking it down into smaller fibers. I’ve seen this technique in a video on how to effectively tenderize meat for grilling. How Do You Cook Beef Stew Meat Without It Getting Tough? To prevent beef stew meat from getting tough, start by quickly browning the meat. When you cook stew, do it low
Mastering Meat Cuts-A Blackstone Grill Guide
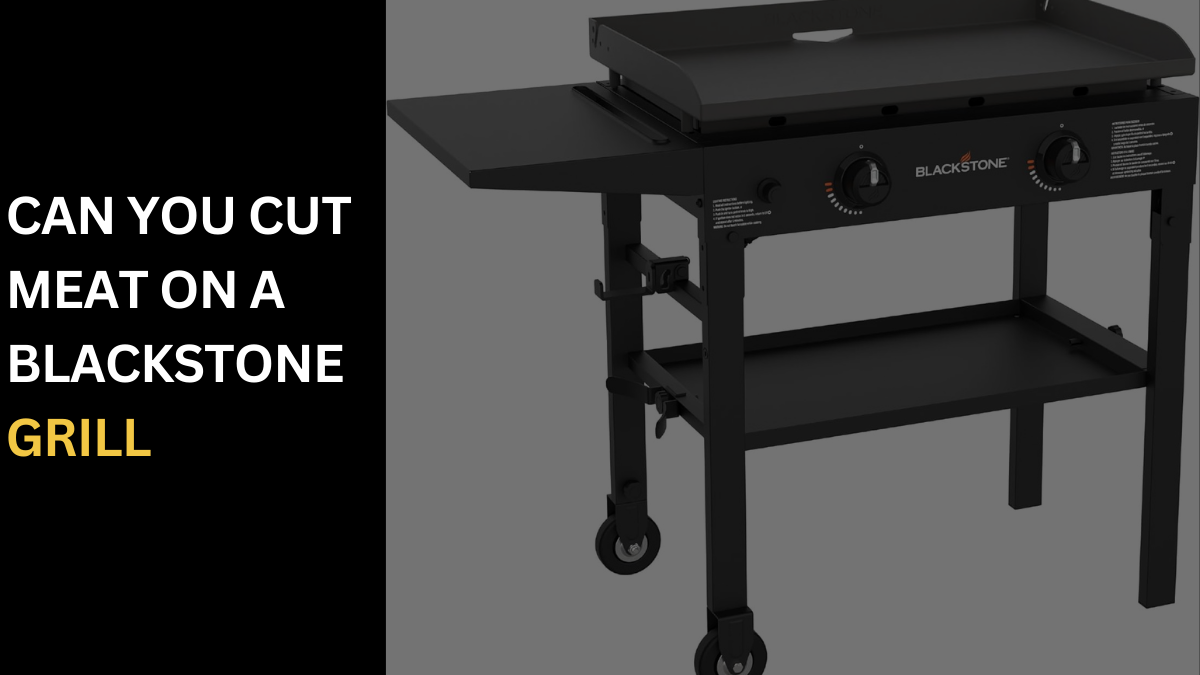
Can You Use A Knife On A Blackstone Griddle? The question of whether you can use a knife on a Blackstone Griddle often arises, and the answer is nuanced. Yes, you can use a knife, but it’s important to be aware of the potential damage to both the griddle and the knife. Cutting on your Blackstone griddle won’t harm it, but it may leave thin cut lines on the seasoned finish. Over time, these areas where you usually cut up food will be less nonstick than before and less protected from rust and other damage. If you want to fix that, then you will need to re-season your griddle, which can be an arduous task. Moreover, using a knife on a Blackstone griddle might not be the best idea for your knife either. Griddle tops are made of rolled steel, an incredibly powerful substance that is resistant to damage, but also quite capable of dealing some damage out of its own. Even just using a knife once on a Blackstone griddle can dull your knife. Therefore, while it’s not a habit most people should adopt, it’s not something to be overly scared of if done sparingly. From personal experience, I would recommend using a cutting board to avoid any potential damage to your griddle or knife. Will Cutting On A Blackstone Griddle Damage My Knife? When it comes to your knife, the Blackstone griddle, made of rolled steel, is a powerful substance that’s resistant to damage. However, it can make your blade duller, turning it into a blunt stick that’s not suitable for real cutting. If the blade is damaged beyond repair, you’ll need to replace it, which can be costly if you use it often. What Alternatives Are There To Knives For Use On A Blackstone Griddle? When it comes to putting on a Blackstone griddle, many people might be tempted to use knives as an alternative to other tools. However, it’s important to consider that knives, especially those with sharpened edges, can potentially cause damage to the seasoning of the griddle. Instead, a griddle spatula, which is heat-resistant and durable, can be a better choice. These spatulas are designed to flip food on a hot griddle without damaging the surface. They are not as sharp as knives, reducing the risk of harming the griddle’s seasoning. Moreover, they are strong enough to chop hard vegetables and tough meats. So, while it’s possible to use a knife on a Blackstone griddle, it’s not always the perfect choice. Griddle spatulas, designed and created specifically for griddles, offer a safer and more efficient alternative for cutting food on the griddle. How You Can Cut Meat on Blackstone Grill? While it’s possible to cut meat directly on a Blackstone grill, it’s not recommended due to potential damage to the seasoning or your knives. Instead, Blackstone offers a cutting board designed to be placed on the griddle surface, allowing you to cut and dice your food without causing any harm. This way, you can achieve that tender bite reminiscent of a fajita with meat so tender every bite was a miracle. So, to avoid any mistakes, read up on proper cutting techniques and use a cutting board to ensure your steak is cooked to mastery. How to cut against the grain – step-by-step Step 1: Here’s a rundown on how to cut your Flank steak after it’s cooked. First, place your slab of flank steak on a cutting board. While it’s possible to cut directly on your griddle, it’s not recommended due to potential damage. One of the first benefits you’ll notice when you cut the flank steak is the removal of the silverskin. To do this, slice into a corner of the steak where the membrane is, then pull it off with your hand while making a gentle slice with your knife. Step 2: Pull off any large slabs of fat from the sides. Now, you need to identify the direction of the grain, which is the long lines on the side of the steak. Once you’ve found the grain line, you’ll notice a groove where the meat is cut. Hold the steak in place with a carving fork or kitchen tongs, and cut in the direction of the grain lines. Step 3: The goal is to cut against the grain lines, not up and down or left to right. The goal is to make the muscle fibers as short as possible. To achieve this, cut straight with your knife at an angle, and don’t twist your wrist or have your knife bent diagonally. Step 4: The resulting slices should be tender. Make your slices as thin as possible, as this makes the cut easier to chew. This is especially important with flank steak, which is naturally grainy. These cuts should be bite-sized for the perfect meal, with slices about ¼ – ½ inch thick.. Once you’re done, you can enjoy your steak. What is grain? In the context of meat, the grain refers to the direction of the muscle fiber. When you look at a piece of meat, you’ll notice lines on the side of the steak. These lines indicate the direction of the muscle fiber. Think of muscle fibers as strong rubber bands that have moved in massive groups to form the muscle. When you’re chewing a piece of meat, it’s like you’re trying to break these rubber bands. This is why the way you cut the meat is essential for its tenderness. If you cut in the same direction as the grain, you’re left with long, tough muscle fibers. But if you cut against the grain, you shorten these fibers, making the meat easier to chew. How to Cook Flank Steak? When cooking Flank Steak, it’s important to remember that this cut of meat can be quite tough if not prepared correctly. Marinades are an excellent way to both tenderize and add flavor to your flank steak. Some popular marinade recipes include Dijon, Worcestershire delish which includes Vegetable oil,
Temperature Tactics – On or Off the Grill Meat Monitoring
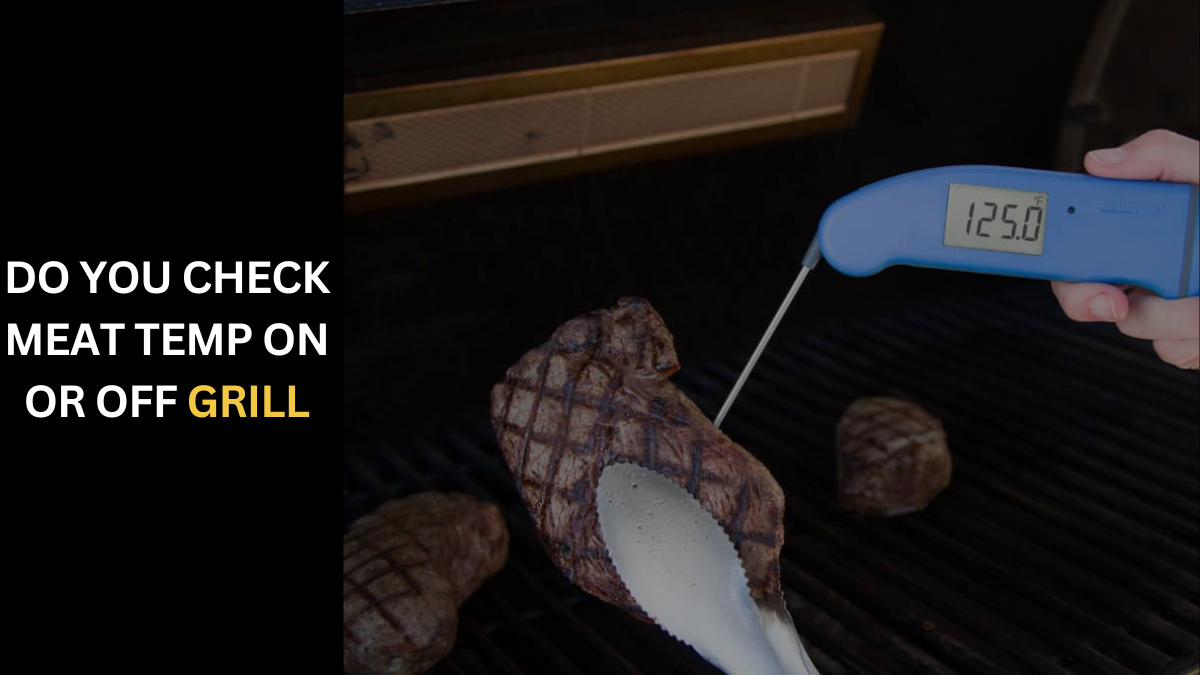
Do You Check Meat Temp on or off Grill? Using a meat thermometer is a helpful tool to ensure your Thanksgiving turkey or pricey steak is cooked to perfection, avoiding a dry, tough mess. It ensures your cooking food reaches a safe temperature, which is particularly important when cooking poultry to prevent undercooked chicken and related illnesses like Salmonella. To check the temperature, the probe should be inserted into the thickest part of the food without touching any bones, fat, or gristle. You can check the temperature while the meat is still on the grill, as taking a reading on the grill doesn’t give an artificially high temp. Wait for the readout to display the internal temperature before deciding whether to continue cooking or remove the meat from the heat source. Keep in mind that the temperature may rise by 5-10 degrees Fahrenheit due to carryover cooking after removing the meat from the heat. When should you use a meat thermometer? A meat thermometer is a valuable tool for ensuring your roast, oven-cooked, barbecue-grilled, or fried chicken reaches a safe internal temperature. When probing food in a deep fryer, always remove the food from the oil and transfer it to a safe surface to avoid the risk of it falling back into the vat and causing potential burns. To use a meat thermometer, insert the probe into the thickest part of the food during the cooking process or near the end of cooking, following the recipe guidelines and checking the temperature before the cooking time expires. What’s the proper way to use a meat thermometer? To use a meat thermometer correctly, you should insert the probe into the right spot of the meat, avoiding any bone or gristle. Insert it into the right spot According to the USDA, the thermometer should be placed in the thickest part of the meat to ensure it reaches a safe temperature. For chicken, pierce the thigh and the thickest part of the breast for the best reading. For meats like ribs or rack of lamb, check the center portion. Get it to the right depth When it comes to depth, thermocouples only need to reach about ¼-inch deep for reading, while digital instant-read thermometers should be inserted about ½-inch deep. Dial thermometers need to be inserted two inches to 2½ inches deep for thicker cuts of meat, such as large roasts, ham, shoulder, or turkey. Don’t wait until the food hits the temperature Carryover heat is a concept every kitchen assistant should understand. When food is removed from the heat, it continues to cook, often reaching its target internal temperature even if it was five to 10 degrees lower when you took it off the heat. Let your steak or other meat rest for about 10 minutes after cooking to allow it to finish cooking and prevent the juices from running out and drying out the meat. As Papantoniou suggests, if you cut into the meat immediately after removing the thermometer, the juices may drain out, leading to a messy carving experience. Reasons to use a meat thermometer Use a meat thermometer to ensure the meat is cooked to the desired level of doneness and avoid over or undercooking. What Type of Meat Thermometer is Best? The best meat thermometers are typically digital rather than analog models. They are fast and accurate, with a thin probe that minimizes damage to the meat. There are two general categories: instant-read thermometers and thermocouples. Instant-read thermometers Instant-read thermometers come in an assortment of styles and are inserted at the end of cooking to check the internal temperature in one or more places in the meat. Digital instant-read thermometers When it comes to grilling or cooking meat, the use of digital instant-read thermometers is a game-changer. These thermometers provide a quick response time, allowing you to check the temperature of your food in a matter of seconds. They are equipped with thermocouples, which are known for their accuracy and speed. One of the key advantages of these thermometers is that they can be used with a corded probe. This means the thermometer stays outside the oven or grill while the probe is inserted into the meat. Some models even have functions that warn you when the meat reaches a pre-set temperature. This feature is particularly useful when you’re busy with other tasks and can’t constantly monitor the cooking process. Moreover, some digital instant-read thermometers can be connected to apps on your phone. These apps can send you a message when it’s time to go outside and check the grill2. This means you can keep an eye on your cooking even when you’re not physically present near the stove or oven. These thermometers are not just reasonably priced but also essential for ensuring the food is cooked to the right temperature Analog meat thermometers While digital thermometers are becoming more popular, analog meat thermometers are still a viable option for many cooks. These thermometers are sold less commonly now, but you might still find them lurking in some kitchens. They work in the same way as digital thermometers: you insert the probe into the thickest part of the meat to get a reading. However, they typically take longer to provide a temperature reading compared to their digital counterparts. The watch-like face of an analog thermometer reflects the internal temperature of the meat, providing a visual and straightforward way to monitor your cooking. Leave-in Thermometers Leave-in thermometers are designed to be inserted into the meat before cooking and left in place throughout the cooking time. They are ideal for tracking the internal temperature of the meat in the oven or on the grill, especially for dishes with long cooking times like roasts or slow-cooked dishes. The probe of these thermometers is typically inserted into the thickest part of the meat, and the base unit, connected by a wire, can be placed outside the oven or grill. This allows you to monitor the temperature without repeatedly opening the cooking appliance,
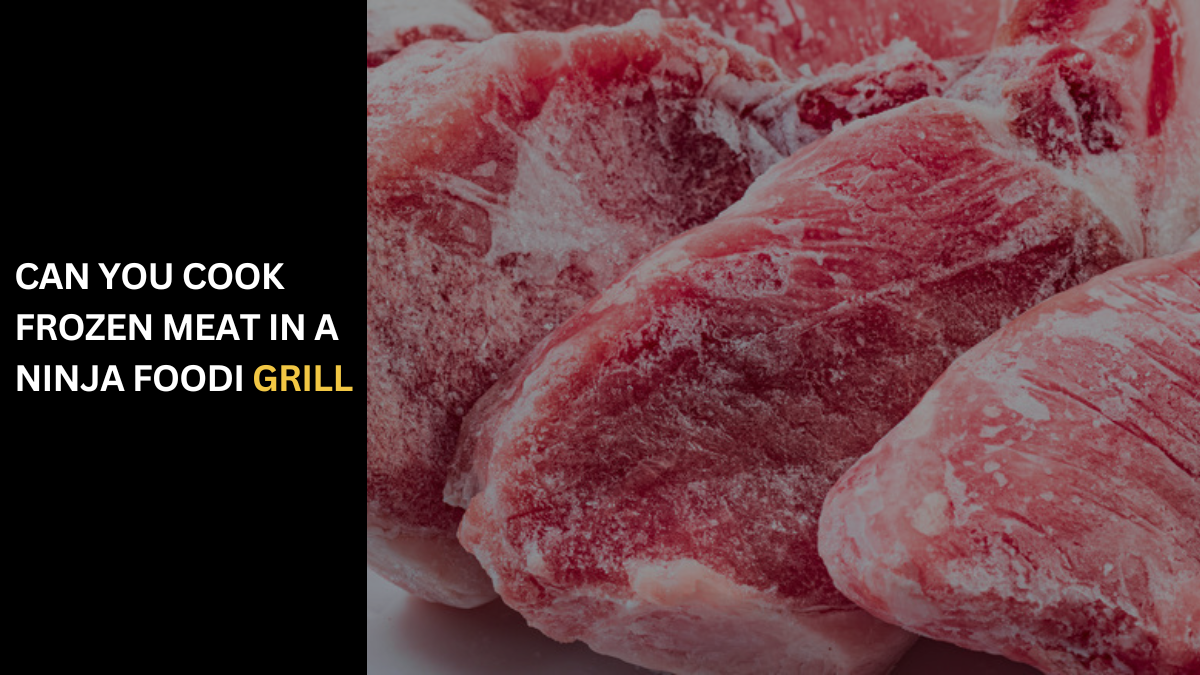
Ninja Foodi Grill Hacks – Cooking Frozen Meat Like a Pro
Can you Cook Frozen Meat in a Ninja Foodi Grill? Delicious Midweek Favorite In the hustle of midweek chaos, discovering a delicious and convenient meal solution can be a game-changer. That’s where the Ninja Foodi comes into play, especially when cooking frozen chicken breast. I was skeptical the first time I tried cooking frozen chicken in my Ninja Foodi. Could it turn out well from frozen? To my surprise, not only did it work, but it became my new midweek favorite. The texture and flavor were spot on, and it saved me the time of defrosting. How To Cook Frozen Chicken Breast In Ninja Foodi To cook frozen chicken breast in the Ninja Foodi, begin by dumping your big block of frozen chicken breasts into the Ninja Foodi. Add liquid (such as broth or water) over the chicken until they are fully submerged. This helps in cooking them evenly and keeping them moist. Next, you’ll move on to pressure cooking. This method is straightforward and guarantees moist and flavorful chicken every time. A Sustainable Culinary Adventure One of the biggest joys in my life is finding sustainable ways to live, which extends into my kitchen practices as well. I have a passion for recycling, whether buying second-hand clothes, or having a second-hand sofa. This love for reuse and recycling has found its way into my cooking habits too, especially with my Ninja Foodie. Cooking frozen chicken breast in the Ninja Foodi has been a delightful discovery. It’s not just about the convenience or the taste, but also about the philosophy it represents. Just like I recycle items and give them a new life, using the Ninja Foodi to transform a simple frozen chicken breast into a delectable meal feels like culinary recycling. It’s about making the most out of what we have, and in this case, it’s turning a frozen piece of meat into a warm, inviting dinner that brings joy to my family. This practice aligns perfectly with my weekend routine, where I love taking the kids to the big recycling bins, and teaching them the importance of sustainability. Similarly, as we sit down to enjoy the Ninja Foodi-cooked chicken, I share with them how we’re making the most of our resources in the kitchen, turning something ordinary into extraordinary. Can You Recommend A Ninja Foodi? I often get asked about which kitchen gadgets I recommend and which ones I use. For the Ninja Foodi, we have this particular model. It doesn’t have as many bells and whistles compared to some of the newer models, but it does a great job. Its versatility is impressive. we can dehydrate, air fry, pressure cook, sauté, slow cook, and even make yogurt, among other things. Plus, I recommend you head over to our Ninja Foodi recipes category. We have been using the Ninja Foodi since 2020 and just love it for its simplicity, how delicious the recipes are when cooked in it, and how much time it saves us in the kitchen. We even take the Ninja Foodi on holiday with us. Tips for Cooking the PERFECT Steak in the Ninja Foodi Indoor Grill Cooking the perfect steak on your Ninja Foodi Indoor Grill is an art, and here are some invaluable tips to elevate your grilling game: 1. Preheat for Success Preheat your grill on the Max grill setting for at least 10 minutes. This ensures your grill grate is sizzling hot and ready to sear your steak to perfection. 2. Bring It to Room Temperature Allow your steak to come to room temperature for about 30 minutes before cooking. This ensures even cooking throughout. 3. Season with Care Season your steak liberally and wrap it in cling wrap. Let it sit in the refrigerator for 24-48 hours to develop a flavorful crust. The longer it marinates, the better. 4. Trust Your Thermometer Invest in a reliable meat thermometer. The trustworthy thermometer is your hardest-working tool. Grill your steaks to within 5-10° of your target temp for that perfect doneness. 5. The Rest is Key Allow your steak to rest for 5-10 minutes before serving. Don’t forget the probe! Leaving it in as the steak rests prevents precious juices from leaking out. 6. Monitor Temperatures Keep an eye on the thermometer’s readings as your meat rests. If it’s pressing down or holding steady, you’re good. If you see any manual feature errors, remember the XL grill can err, so give it a double-check. 7. Stay Calm and Have Fun Don’t stress! Cooking steak should be enjoyable. If it overcooks or you don’t like it, don’t chop it; turn it into something else, like a steak & cheese or a twice-baked potato. Grill on and have fun! Obsessed with Recycled Food As someone who’s obsessed with the idea of recycling food, I find real enjoyment in reimagining leftovers into something new and exciting. A once ordinary meal becomes extraordinary on days two or three. My home is a haven for creative cooking, where even a simple frozen chicken breast in the Ninja Foodi gets a new life. Revolutionizing Meal Preparation My dinner habit transformed when I started using Ninja Foodi’s frozen chicken technique. This method has become a staple in my kitchen, especially on busy days. Before, I used the slow cooker way too much, often resulting in meals that, while tasty, were left to be dumped in the freezer as stock for future soup. Now, with the Ninja Foodi, I’ve developed a new routine: make a meal, load the leftovers into the Foodi, and blend them into something ready to serve the next day. It only needs a quick reheat, saving significant time. This technique, as mentioned above, has been a game-changer for me. I can pour in frozen chicken, and it comes out perfectly pressure-cooked and solid, just the way I always liked. What I once saw as a daunting task has now become a simple, enjoyable process. Rinse and Repeat with Chicken Thighs The beauty of the Ninja

The Great Grilled Cheese Experiment – Meat Edition
Can A Grilled Cheese have Meat? WHY ADD MEAT TO YOUR GRILLED CHEESE? A Few Reasons You Might Want to Consider Adding Meat to Your Grilled Cheese When I first contemplated the idea of adding meat to a grilled cheese, it seemed almost sacrilegious. But, as someone who relishes a culinary adventure, I gave it a go. The end product was a revelation – a treat that was golden brown, oozing with cheese, and bolstered by the savory goodness of meat. The real reason to add meat to your grilled cheese goes beyond just creating a more substantial meal. For those looking for something that’s both heartier and more filling, this is a no-brainer. The combination of delicious flavors from both the cheese and meat can complement each other in an unexpectedly delightful way. Whether it’s the classic crispness of bacon, the rich depth of ham, the nuanced tastes of cured meats, or even a thinly sliced piece of steak, they all elevate the humble grilled cheese into something that can keep you satisfied for hours. I’ve experimented with various recipes and found that the deliciousness of grilled cheese with meat is hard to match. It’s the perfect solution when you’re looking for something more filling. So, if you haven’t tried adding meat to your grilled cheese, I’d say give it a try. You won’t be disappointed They Call Them Grilled Cheese for a Reason Grilled Cheese Sandwiches: A Trend Beyond Restaurant Menus In the trend of modern restaurant menus, grilled cheese sandwiches have evolved from simple bar fare to a canvas for creativity among sophisticated eaters. I remember a sandwich shop my wife and I stumbled upon, where grilled cheese took top billing, outshining even the ham and cheese sandwich. These sandwiches were fantastic, but they led me to ponder: should grilled cheese stay classic, or are these fancified cheese and bread concoctions with their myriad additions the new norm? The comfort food that is a classic grilled cheese often becomes a complete meal with the simplest of touches – like tomato or pickles. But as I’ve seen in this world of cheesy creations, including everything from pizza to cubes of delicious dairy goodness, there’s a growing inclination to make grilled cheese sandwiches more interesting by building on them. It’s not uncommon to see a veggie sandwich or a BLT get a grilled cheese fake out. However, when meat becomes a primary component, it shifts the dish away from its silent, yet solid standing in Western culture. This southern approach I once enjoyed, where cheese played second fiddle to bacon, was a beautiful yet interesting twist. But at its heart, a grilled cheese is about the delicious, dairy richness meeting the grilled crispness of bread. It’s a trend that’s gussied up for sophisticated eaters, yet remains a classic at its core. The Art of Making Perfect Grilled Cheese: My Favorite Method There are many classic ways to make grilled cheese, and having used to work in a diner, I’ve seen them all. Some people smear Mayo on the outside of their sandwiches before toasting, but I prefer the simple, no-nonsense approach. Nope, it’s all about the butter. I melt a bit in a pan, making it easier to coat the sides of the bread. Using a skillet on medium-low heat helps me gauge how hot it is, so I don’t accidentally burn the bread. Once coated, I cook each side for about three to four minutes, or until they’re golden brown and the cheese has thoroughly melted. More Things to Put in a Grilled Cheese Sandwich Instead of Meat Taking Your Grilled Cheese Sandwich to the Next Level: Beyond the Original While some might find out that adding meat takes a grilled cheese sandwich from plain to gourmet, there’s a world of ingredients that can elevate this original, humble dish without it. Taking your grilled cheese to the next level doesn’t necessarily involve sliding in a slice of bacon or ham. Instead, think about the cheese slice as the star and what can melt harmoniously with it. When you check the pantry, remember the sky is the limit. Imagine toppings that enhance, not overpower, the melted cheese. From sun-dried tomatoes to caramelized onions or a sprinkle of herbs, these ingredients can transform each bite into an adventure without falling out of the sandwich’s character. It’s about creating a meal where each element complements the other, crafting a taste experience that’s both familiar and exciting. So, next time you’re making grilled cheese, try reaching for something unexpected and see how it turns your sandwich into a gourmet delight without needing meat. Elevating Grilled Cheese with Tomato Slices As a kid, I used to dip my grilled cheese sandwiches in ketchup. But now, adding tomato slices inside the sandwich elevates the taste to a whole new level. It has become my favorite way to enhance the sandwich. Placing thick slices of tomato within the layers, I’ve discovered the flavor potential they hold. A sprinkle of salt and some freshly ground black pepper can transform a plain grilled cheese into a gourmet sandwich. BACON Bacon: A Crunchy Addition to Grilled Cheese Adding bacon to a grilled cheese sandwich introduces not just flavor but a delightful crunch. I like to cook the slices separately and then lay them on the bread once it’s cooked. Placing them on top of the cheese before the final grill not only enhances the taste but also pairs well with different veggies. If you haven’t tried it yet, I’d definitely recommend giving it a go. ONIONS Onions: A Flavorful Surprise in Grilled Cheese Ever wonder how cheese and onion would taste in a sandwich? From my college days at a local bar, I learned to cook a mean grilled cheese with onions. It’s a surprisingly flavorful and tasty combination. If you think bacon makes everything better, wait until you try grilled cheese with onions and see for yourself! MUSHROOMS AND POBLANOS The Magic of Mushrooms and Poblanos
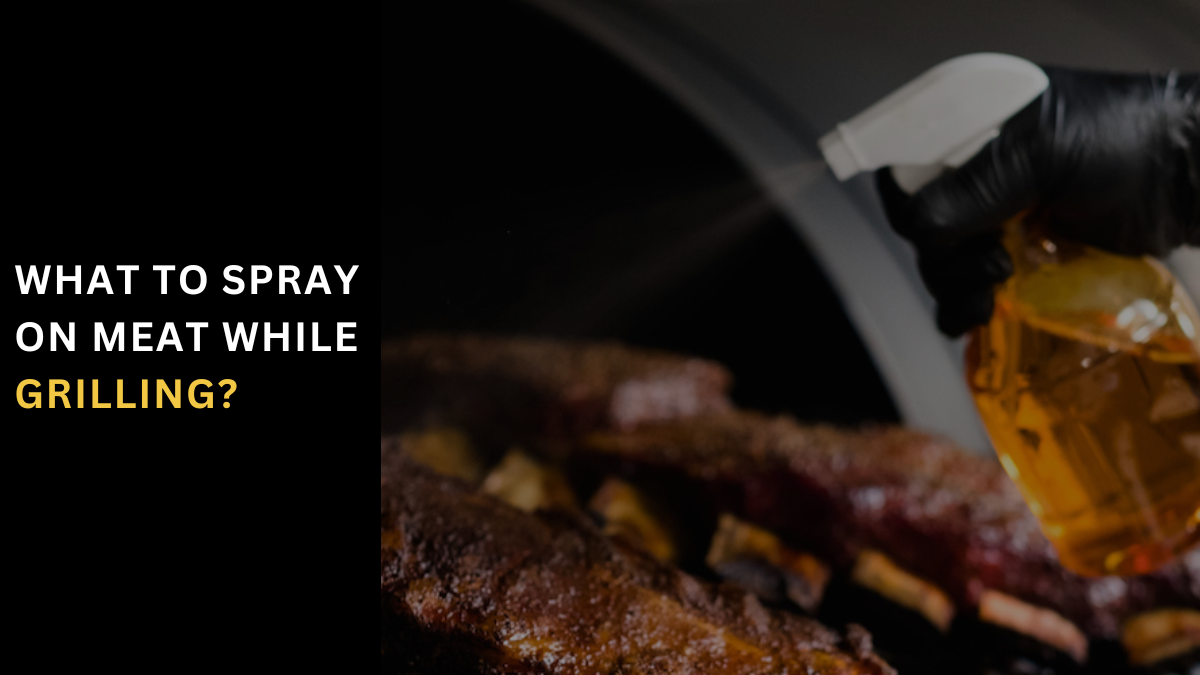
Grill Masters Reveal – The Secret Sprays for Perfect Meat
What to Spray on Meat While Grilling? Grilling is an art, and like any art, it requires a touch of creativity. One way to express this creativity is by concocting your spritzing liquid. This involves mixing various liquids, such as juices, and even herbs to create a unique flavor profile for your grilled meats. When it comes to grilling, one of the key elements to achieving that perfect, juicy, and flavorful bite is the spritzing process. This involves using a spray bottle to moisten your meat with a thin mixture of flavorful liquids, ensuring an even distribution of flavor and preventing the meat from drying out. Liquids For Spritzing The liquid concoction you choose to spritz can greatly influence the final taste of your grilled item or smoked item. A popular choice among grill masters is apple cider vinegar, which adds a tangy kick and helps to lock in moisture. This is particularly important during the smoking process, which can be quite a dry process and can lead to lost moisture in the meat. To keep your meats juicy and tender, you might also consider a combo of juice and vinegar as your liquid of choice. Other options for your grill elixir or BBQ spray could include apple juice, Worcestershire sauce, or soy sauce. These not only help to maintain moisture but also contribute to their unique flavors. If you’re feeling adventurous, you could even experiment with a marinade, inject, or brine to give your meats an extra “oomph” of flavor. Remember, the goal of spritzing is to add an extra layer of flavor and complexity to your dish, taking it to the next level. So, don’t be afraid to get creative with your flavored liquid. Just ensure that it’s a thin mixture that can be easily misted onto the meat. You can apply it using a basting brush or a basting mop for larger cuts of meat. In the end, whether you’re using a simple marinade, a complex mop sauce, or your secret grill elixir, remember that the goal is to enhance the natural flavors of the meat, not overpower them. So, go ahead, fire up that grill, and let the spritzing begin! Homemade Spritzing Mixtures When it comes to making your spritzing mixtures, the possibilities are endless. You can get carried away with your favorite flavors, but remember, the goal is to enhance the natural flavor of the smoked meat, not overpower it. So, whether you’re a fan of a tangy citrus spritz or a spicy chili concoction, always aim for a balance that complements the meat’s inherent flavors. In the end, the perfect spritz makes your grilled meats sing with flavor, keeping them moist and adding a layer of complexity that makes every bite a delight. So, don’t be afraid to experiment and find your signature grilling spritz. Tools used for Spritzing while Grilling When grilling, using the right tools can make all the difference in achieving the perfect flavor and texture. One such tool is a spritzer, which is designed to spray a flavorful liquid onto the meat during the cooking process. These versatile tools come in various forms, such as high-tech stainless steel pumps for large applications, hand-held sprayers for low-volume applications, and even plastic spray bottles in good condition. A step-by-step process of spritzing while Grilling Grilling is an art, and spritzing is a technique that can enhance the flavor and texture of your smoked meat. Here’s a step-by-step guide to spritzing while grilling. 1. Preparation: Start with a smoker that’s properly heated. Aim for a temperature range of 225–250 °F (107–121 °C). Use a meat probe to check the temperature. Avoid inserting the probe into the bone as it can give an inaccurate reading. 2 . Smoking: Place your meat in the smoker and let it absorb the desired amount of smoke. You can cover the meat with aluminum foil to retain moisture and enhance smoke absorption. 3. Spritzing: After the first hour, begin to spritz the meat every hour to keep it moist and prevent it from drying out.. For your first attempt, you might want to use apple juice as it’s a classic choice that imparts an original flavor to the covered meats. 4. Experimentation: As you get more comfortable with spritzing, you can start to experiment with different flavors. Try spritzing juices from fruits like strawberry or mango to introduce more flavors. 5. Application: When spritzing, aim to apply 1 to 5 layers, with each layer consisting of about 10 sprays. This provides a thicker coverage without adding too much liquid, which could cause the meat to steam rather than smoke. 6. Texture: The goal is to achieve a balance between soft and chewy and crispy and tender. Monitor the internal temperature to avoid overcooking 7. Resting: Once the meat is done, let it sit for about five minutes before serving. This allows the juices to redistribute throughout the meat, enhancing its flavor and tenderness. If you cut into the meat too soon, the juices may spill out. Remember, the key to a successful grilling experience is patience and practice. Happy grilling! Spritzing Benefits Spritzing helps to lock in moisture and add an extra layer of flavor to the meat. Some popular liquids used for spritzing include apple cider vinegar, beer, wine, and apple juice. However, you can also experiment with other liquids like marinade, inject, or brine to create a unique flavor profile for your grilled meats. It’s essential to monitor the temperature of the meat using a meat probe to avoid overcooking and ensure the perfect result. Important Things to Consider When spritzing, it’s crucial to strike a balance between adding moisture and maintaining the meat’s natural flavors. A well-executed spritz can enhance the meat’s natural flavor without overpowering it. So, whether you’re a fan of a tangy citrus spritz or a spicy chili concoction, always aim for a balance that complements the meat’s inherent flavors. In the end, the perfect spritz makes your grilled meats sing
Frozen Flavor – Unlocking Secrets of Freezing Grilled Meat
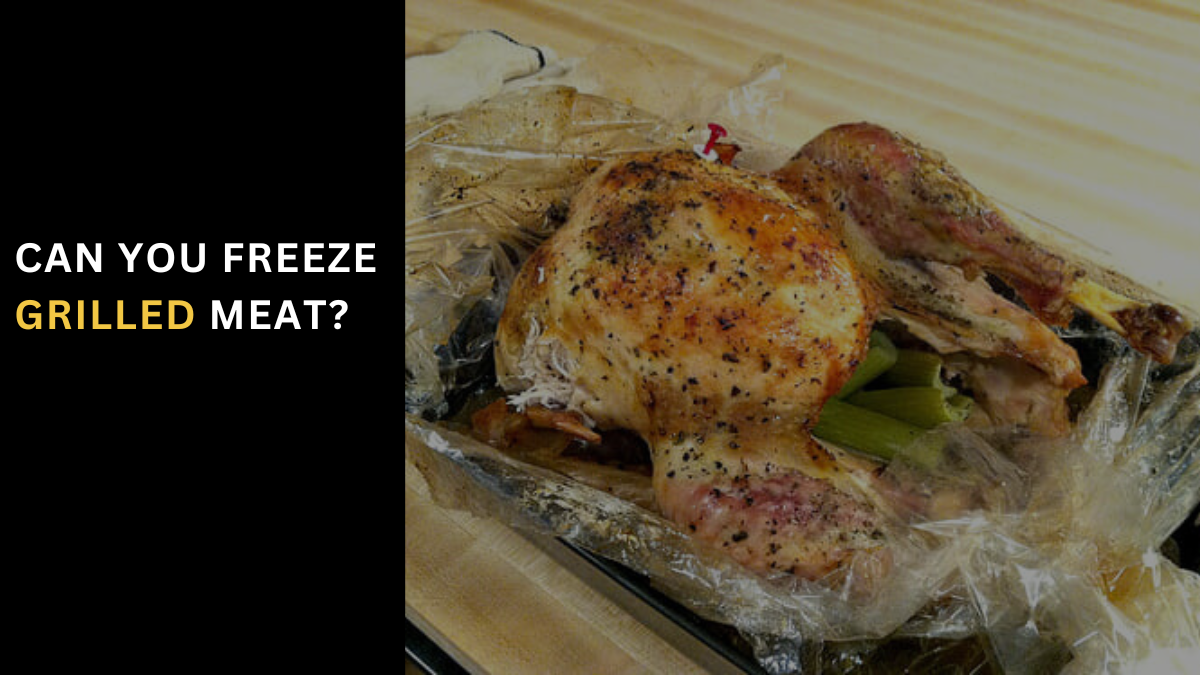
Can you Freeze Grilled Meat? How To Freeze Meat: A Step-by-Step Guide on Freezing and Thawing 1. Ensuring Meat Quality Before you consider freezing any meat, it’s crucial to assess its quality. I remember once picking up some USDA prime and choice cuts from the local grocery store. If it’s raw meat, such as bacon or sausage, remember it can stay good for up to twelve months. For shorter-term storage, like two months, these guidelines are perfect. 2. Freezing Raw Meat vs. Cooked Meat There’s a notable difference between freezing raw meat versus cooked meat. For instance, when storing a cooked whole chicken in the freezer, it’s simpler to thaw and reheat compared to raw meat. Cooked meat should be prepared for freezing and can be stored for up to three months, ensuring it’s safe and tasty when eating. 3. Avoiding Ice Crystals: The Fastest Way to Freeze Meat Properly The key to freezing meat effectively is to freeze it quickly. This step is vital to prevent the formation of ice crystals which can ruin the texture. When I bring raw meat home, especially chicken breasts, ground meat patties, or hot dogs. I always store them at room temperature for the shortest time possible to avoid losing their freshness. Ideally, you should freeze the meat within a day or two, ensuring the freezer temperature is set to zero degrees Fahrenheit for maximum preservation. 4. Simplify Storage: Portioning Your Meat for Easy Freezing and Thawing Portioning your meat is a smart move. Divide it into meal-sized portions before freezing. This way, when it’s time to thaw and prepare, you only take out what you need. As someone who often cooks at home, this approach not only maintains food safety but also aligns with efficient home cooks’ storage guidelines. 5. Preserve Freshness: Expert Tips for Wrapping Meat Before Freezing When it comes to freezing grilled meat, wrapping it properly is crucial to maintain its freshness and prevent air exposure. I’ve learned from experience that using a vacuum sealer is ideal. However, if you don’t have one, freezer paper, freezer bag, plastic wrap, aluminum foil, or parchment paper are all excellent alternatives to store your meats securely. 6. Seal the Deal: Securely Storing Meat in Plastic Bags for Optimal Freezing Once wrapped, place your meat in plastic bags and ensure a firm seal. I prefer using zip-top bags for an airtight closure to guard against freezer burn. This step is vital in preserving the freshness of your grilled meats. 7. Stay Organized: How to Label Your Meat Storage Containers Finally, using plastic containers or the bags themselves, always label your storage containers. Note the cut of meat and the date of purchase. This practice helps track the time your meat has been stored, reducing waste and keeping your freezer organized. Pro Tips: Freezing Meat and Maximizing Frozen Meat Usage Freeze Bigger Meat Portions Like a Pro When freezing larger cuts of meat, it’s different from handling smaller cuts. It’s advisable to double-wrap or triple-wrap them in freezer paper and aluminum foil. This extra protection ensures the meat retains its quality during freezing. The Art of Freezing Meat Alongside Vegetables or Casseroles Freezing meat along with veggies or in casseroles is an efficient way to prepare meals in advance. Whether it’s a meat casserole or other cooked dishes, the combination of ingredients can be frozen together. However, when dealing with raw meat, ensure it defrosts properly before you eat. Safely Thawing Meat: A Quick Guide Defrosting meat is a delicate process. The best method is in the refrigerator, which although slow, prevents the growth of harmful bacteria like Salmonella and E. coli. Avoid using a water bath or cold water for quick thawing and never leave it on the countertop. Always cook your thawed meat immediately to prevent spoilage. The Ultimate Guide: How Long Can Meat Be Frozen The length of time you can freeze meat and keep it tasty depends on several factors. For instance, if you’re freezing a Scott Brothers delivery, check the product label for confirmation. These products are designed for future scrummy meals, so the labels typically provide fantastic guidelines. In general, the flavor, color, and texture of meat can be affected over time, even when stored correctly. Always refer to product labels and recommendations for specific storage times. Most freezers are designed to perform well for certain storage times. As a rule, the quality of stored meats remains higher the shorter the storage period. Freezing Beef: What’s the Shelf Life in the Freezer? Beef Roasts and Beef Steaks can be safely frozen for up to 12 months. This extended duration helps in planning meals well ahead. However, for Beef Mince, the maximum freezer shelf life is a bit shorter, up to 6 months. Frozen Chicken: How Long Is It Safe to Store in the Freezer? When it comes to poultry, both Chicken Breast and Leg pieces, as well as a Whole Chicken, have a similar freezing time frame of up to 6 months. This duration is ideal for maintaining the quality and taste of the chicken. Processed Meat Freezing Tips: How Long Is It Good for in the Freezer? For processed meats, Sausages and Black Pudding can be stored in the freezer for up to 3 months. On the other hand, Hamburgers can be kept frozen for up to 6 months. Cooked Meat Freezing Guide: How Long Can You Keep It Frozen? Cooked meat or poultry leftovers, Pies and pastries, and Haggis can all be frozen for up to 3 months. However, Meat stock can be kept for a longer period, up to 6 months, which is incredibly useful for impromptu soup and stew preparations. Mastering the Art of Freezing and Reheating Marinated Steak To freeze a cooked marinated steak, let it cool to room temperature. Please place it in an airtight, sealed plastic freezer bag to prevent it from drying out. A helpful tip is to spoon any leftover juices from the cooking process into the bag
Grill & Thrill – A Complete Guide to Gas-Grilled Fajita Meat
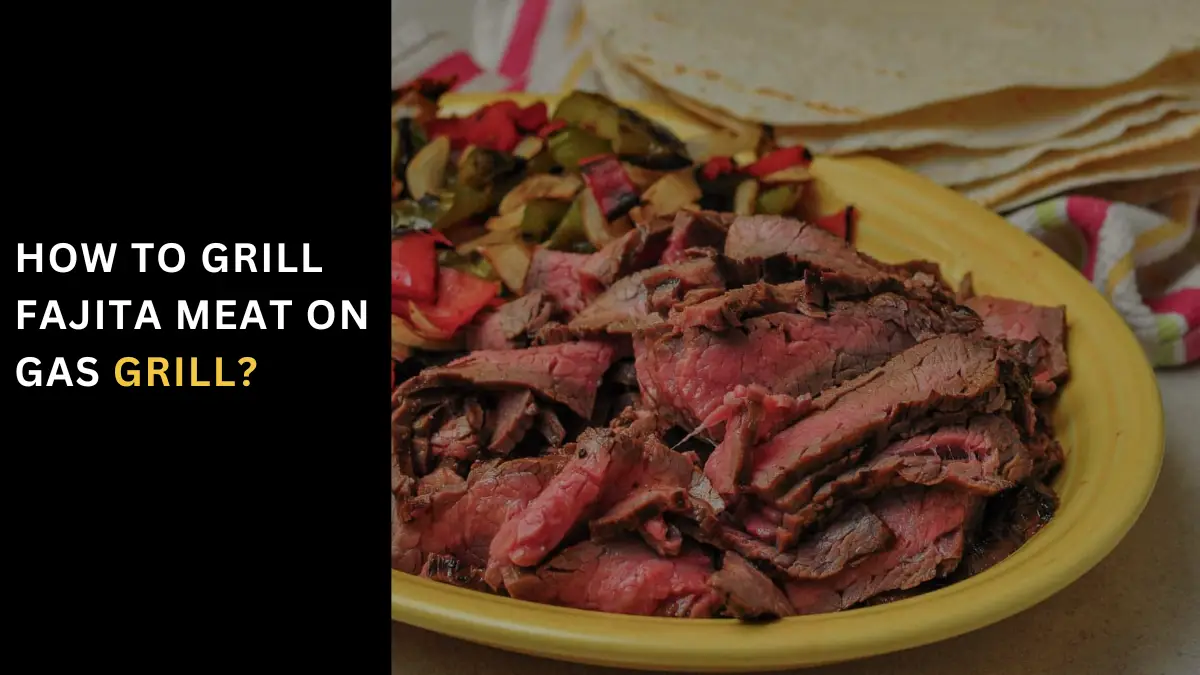
How to Grill Fajita Meat on Gas Grill? Learned Fajita Marinade When I first discovered the fajita marinade in Robb Walsh’s “The Tex-Mex Grill and Backyard Barbacoa Cookbook,” I was genuinely surprised by its unique ingredients. The use of pineapple and soy sauce in a traditional Mexican recipe seemed unconventional, yet it perfectly embodies the essence of Tex-Mex cuisine – a harmonious blend of flavors from both sides of the Norteno border of Mexico and the US. My journey into cooking grilled beef fajitas began in my backyard, far from any Tex-Mex restaurant or Mexican restaurants across America. The key to the perfect marinade lies in the pineapple juice. This tropical fruit contains an enzyme called bromelain. A proteolytic agent that breaks down protein. It adds not only an unexpected hint of sweetness but also tenderizes the steak. The soy sauce, on the other hand, injects an intense umami flavor, enhancing the beefiness of the meat. Ingredients Steak Fajita Marinade When it comes to making the perfect Fajita, the secret lies in the Marinade. My go-to recipe includes steak, ideally, flank steak about 1.5 lbs and 1-inch thick. You can also substitute with skirt steaks or flat iron steaks if preferred. The marinade is a blend of pineapple juice, soy sauce, and Worcestershire sauce for that umami depth. The zest and juice of a lime, finely grated with a microplane, along with freshly minced garlic, add the necessary zing and aroma. Marinate the Beef For the perfect Fajitas, start by marinating the beef. Mix your marinade ingredients and put aside a portion for later use. Pour the rest of the marinade into a gallon zip-top bag and add your flank steak. Carefully squeeze out any excess air and let the steak marinate for anywhere between 30 minutes to 2 hours. The pineapple in the marinade ensures the meat becomes wonderfully soft and infused with flavor. Prep the Vegetables Next, prep the vegetables. Core and seed your bell peppers, cutting them into 3 to 4 large, flat pieces. Slice the sides of the onion into ½-inch thick slices and sprinkle with 1 teaspoon of salt. For those who enjoy a bit of spice, serrano peppers and jalapeno peppers can be grilled whole to add an extra kick to your fajitas. Preheat the Grill for Direct Medium Heat (350°F) For a successful fajita feast, start by preheating your grill to direct medium heat, aiming for around 350°F. If you’re using a Weber Summit, set the burners to high for 10 to 15 minutes, then brush the grill grates clean and turn down the heat to medium. Next, take the flank steak out of the marinade, letting any excess marinade drip off. Place the pepper planks and hot peppers on the hot grill over direct heat. Use a 3-3-3-3 pattern, grilling each side for 3 minutes with the lid closed on a gas grill. Flip and turn the steak 90 degrees to create beautiful crosshatch grill marks. Grill until it reaches an internal temperature of 125°F at the thickest part, as measured with an instant-read thermometer, for medium doneness. Transfer the steak to a baking dish or large bowl, and pour about ¼ cup of reserved marinade over it to coat and let it rest. Meanwhile, toast the tortillas on the grill for the perfect finish. Toast the Tortillas in Batches Slice, Serve, and Enjoy Toast your tortillas on the grill for that authentic touch. Brush the grate clean with a grill brush, then lay the tortillas in a single layer. Allow them to toast for about 30 seconds to 1 minute until you see light grill marks on the bottom. Flip them to toast the other side, watching as they puff up slightly. Keep the warm tortillas wrapped in a cloth towel while you repeat the process in two to three batches, depending on the size of the grill. Once done, remove the serrano and jalapeno peppers from the grill into a bowl. Peel off any blackened skin, then slice them thin and move to a small serving dish. Cut the bell peppers into ½-inch thick slices and slice the onion into rings or halves. Toss them back on the grill briefly to coat them with the marinade before moving them to a platter. Remove the flank steak and slice it lengthwise and then crosswise into as long pieces as possible. Pour any juices from the cutting board over the steak. Serve everything together and enjoy your homemade fajitas. Equipment When it comes to grilling a lot of food at once, bigger is better. I love my extra-large Weber Summit gas grill for this reason. The extra space not only helps with a recipe like this but makes the whole experience more enjoyable. Variations in Fajitas Chicken Fajitas For a twist on the traditional Fajitas, you can replace the flank steak with pounds of boneless, skinless chicken breasts. The cooking time remains largely the same, ensuring a seamless transition from beef to poultry without compromising on flavor or grilling technique. Real Fajitas When aiming for authentic Fajitas, opt for skirt steak, which holds a special place in Spanish cuisine. To use skirt steak instead of flank, adjust the cooking time. Cook for fewer minutes, rotating and flipping each side for even grilling. Since it’s thinner, it requires less time to reach the perfect level of doneness. What to Serve with Grilled Beef Fajitas Tips and Tricks When serving grilled beef fajitas, my favorite toppings include classic salsa and sour cream. Shredded lettuce adds a crisp texture, while a squeeze of fresh lime elevates the flavors. My kids love the addition of generic Mexican cheese from the grocery store, but for an authentic touch, try crumbled Queso Fresco. As for side dishes, Rice and Cilantro Refried Beans are my go-to choices to complement the fajitas. Cooking on a smaller grill Cooking on a smaller grill like a Weber Summit? No problem. It helps to work in batches due to the limited surface

Barbecue Buddies – Exploring Grilled Meat for Dogs
Can Dogs Eat Grilled Meat? Safety Tips, What Dogs & Cats Can Eat When the sun is out and the weather is warm, it’s a great time to be outside and enjoy a delicious BBQ. It’s fun for everyone, including our beloved cat and dog. In my yard in Tucson, I’ve often seen pets curiously sniffing around the grill. Many vets I’ve talked to emphasize the importance of being cautious about the BBQ foods we feed to our pets to keep them safe. Be very careful of the foods you feed your pet Everybody knows certain foods are safe for people but can be deadly or toxic to cats and dogs. Common BBQ items like chocolate, raisins, and grapes are known no-nos. But did you know that even dessert snacks left on tables, like hotdogs and fatty burgers, are bad? These items are loaded with calories and are unhealthy for pets. A normal-sized dog weighs approximately 9kg (or 20 pounds), and the equivalency of them eating a couple of burgers is like a human sitting and devouring several at a time. This subject matter is close to my heart. Furthermore, meats that contain bones, like sticks of ribs, chicken wings, or kabobs, might seem like delicious wonders for humans, but they are a choking hazard for pets. Small pieces of wood can get stuck in their throat, and pointy ends can puncture their digestive tract. In conclusion, when you’re grilling in the sunshine, remember these tips to ensure your furry friends enjoy the day as much as you do, safely and healthily. Following is a list of some harmful BBQ foods that you should NOT FEED your cat or dog When grilling, it’s tempting to share a bite with your furry friend but beware. Some meats, uncooked or cooked, that are safe for humans can make your pet sick due to bacteria like salmonella. Onions, shallots, scallions, and garlic are flavorful add-ons to our food, but they can destroy a pet’s red blood cells, creating a toxin buildup known as Allium toxicity. Hotdogs, a favorite at BBQs, are laden with calories, fats, and unhealthy levels of salt and preservatives, leading to diarrhea and other digestive issues. Even a small portion can harm. Chicken Wings, often served bone-in, pose a choking hazard and can puncture the digestive tract. Corn on the cob, due to its shape and size, can block an animal’s airway or choke them. Guacamole is another popular dip that can cause distress; its ingredients can be toxic to pets. Chips and pretzels, those crunchy snacks we love, contain an excessive amount of sodium, leading to increased thirst, urination, and in severe cases, sodium ion poisoning with symptoms like vomiting, tremors, fever, depression, seizures, and even death. Now let us list some of the BBQ foods YOU CAN FEED cats and dogs Navigating a BBQ with your pet can be tricky, but there are safe options. Lean burgers and grilled meats like steak and fish, when boneless and plain, are good choices. Ensure they’re fully cooked to avoid any health risks. For vegetables, opt for those that are pet-friendly and cooked without spices. A hamburger, broken into a couple of small bites, can be a treat, but avoid any with seasonings or sauces. Unseasoned chicken is also safe and often appreciated by our furry friends. And for a sweet treat, a bit of Seedless watermelon can be refreshing, especially on a hot day. Remember, moderation is key to keeping your pets happy and healthy during your BBQ gatherings. Why you should NEVER share BBQ food with cats or dogs As Leticia Fidalgo Buron, a vet and technical manager at Webbox, points out, it’s essential to understand why cats and dogs should not eat BBQ food. It might be tempting to share sausages, burgers, or scraps from our barbecue, but there’s a potential for harm to our furry family members. A casual BBQ might turn risky if we don’t leave the food unattended while enjoying the outdoors. Many items typically found at a BBQ, like corn on the cob, kebab sticks, chocolate, grapes, raisins, ribs with bones, and anything with onions, are hazardous. However, there are some ok items if prepared carefully: cooked, deboned chicken, turkey, salmon, and certain vegetables. As for cheese, options like cheddar, gouda, or Swiss can be given in moderation. Paying particular attention to how we cook these items is key for the reasons mentioned. 1. Saltly food can leave your pets dangerously dehydrated Salt is not only bad for humans in high quantities, but it’s also dangerous for animals. Many barbecue foods are high in salt levels, leaving pets excessively thirsty. According to Leticia, in serious cases, this can even lead to elevated temperatures and seizures. 2. Incorrectly cooked food is dangerous to pets The risk of food poisoning from uncooked meat is a real effect to consider for your pet. When Barbecuing, it’s crucial to properly cook the food all the way through. Animals can contract nasty bacteria like raw salmonella or listeria from undercooked foods. Leticia warns that even the least of these can cause digestive upset, diarrhea, or vomiting, and in some instances, they can lead to more serious conditions. 3. Bad bones could cause pets to choke There’s a common misconception that it’s safe to feed dogs bones, but this can be dangerous. Leticia notes that in some cases, this can lead to severe gastrointestinal problems or even internal damage. Owners should be particularly wary of small T-Bones from steak, an issue often overlooked. Chicken bones can get stuck in an animal’s intestines or stomach, and all kinds of bones can cause them to choke or obstruct the esophagus. 4. Letting your pets eat BBQ food could cause cancer When it comes to BBQs, we often overlook the dangers of carbonization on the outside of burnt meat. Not only can this cause vomiting and stomach upset in pets, but experts are also citing a more alarming risk: cancer. Leticia, a