

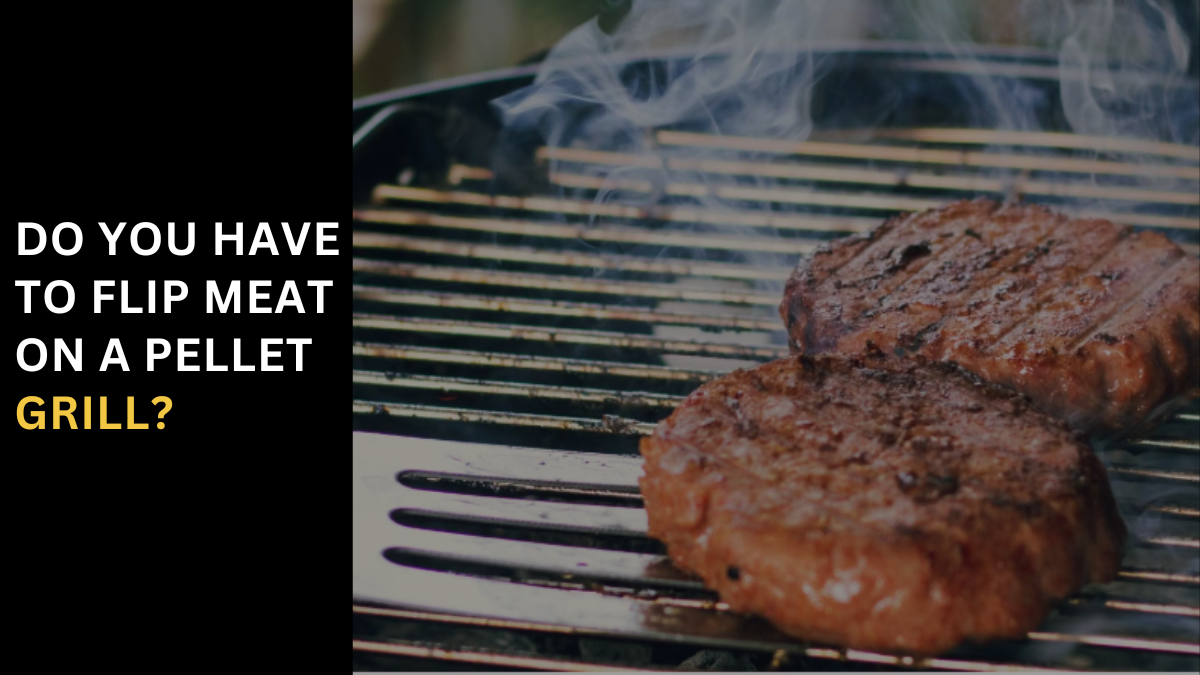
Do You have to Flip Meat on a Pellet Grill Should You Flip Meat When Smoking? When it comes to smoking meat, the goal is to add a delectable flavor and create a depth of taste that transforms a simple cut into a culinary masterpiece. For new pitmasters and those trying it for the first time, this can seem like a daunting task. The best way to become great in this field is by putting in the time to learn and experience, perfecting your skills. One of the key secrets is attention to detail, which is required in various factors that play a part in the process. To ensure you pay close attention, it all starts with the cut of meat you choose, the seasonings used, the type of wood selected, and crucially, temperature control. After these processes, don’t forget the importance of resting your meat before you slice it. These steps collectively contribute to whether or not flipping the meat is necessary. CAN I FLIP MEAT WHEN SMOKING? One of the most commonly asked questions is whether you can flip meat while smoking. The answer to this question is relative, depending on various factors such as the size and position of the meat, as well as the heat source. Remember, smoking necessitates slow and low cooking, and keeping a close eye on the temperature is essential to maintain constant temperatures. This can be challenging, and flipping larger cuts might mean having to open the smoker too often, which can affect the cooking process. Access to the meat and the heat source can make a significant difference in the outcome. In my experience, maintaining a steady temperature and being patient with the process are more critical than flipping the meat. Each time the smoker is opened, there’s a risk of temperature fluctuations that can affect the cooking process. However, for some smaller cuts or specific recipes, flipping might be beneficial to ensure even cooking. SIZE OF YOUR CUT OF MEAT When grilling on a pellet grill, the size of your cut of meat plays a crucial role. Small cuts of meat tend to cook faster than larger pieces. For the smaller cuts, I often recommend flipping them at least once, halfway through the cooking process. The thickness of each piece is also significant in determining whether you should flip or not. From my experience, flipping ensures even cooking, especially for thicker and larger cuts. SIZE OF THE SMOKER The size of your smoking area greatly influences the cooking time and method. In a large cooking area, it’s often necessary to flip or rotate the meat to ensure it cooks evenly. Food in some smokers can experience cold and warm parts due to indirect heat. That’s one reason I recommend acquiring a top-notch smoker like the Bradley Smoker. Its vertical design and electric heat source offer better control over temperature, and a good smoker can save you the hassle of constantly rotating the meat. The well-positioned racks in these smokers allow for an even distribution of smoke and heat. My advice? Don’t rush into flipping every cut. Allow the smoke and heat to work their magic while, and only after, consider flipping for uniform cooking. When To Flip Meat On A Pellet Grill (Explained) Pellet grills are versatile cooking machines capable of everything from slow smoking a brisket to grilling burgers or even baking a pizza. It’s no wonder there’s a debate about whether meat should be flipped, unlike with regular charcoal or propane grills where food can easily be burned. For Slow-smoked items like ribs typically smoked at around 225°F, flipping is less necessary than for items cooked at higher temperatures, such as steaks grilled at 450°F. Smoking is a low, indirect method where the air surrounding the meat affects how it cooks, reducing the need to cover or flip. Let’s explore some common scenarios where flipping needs to be considered. Do Not Flip Meat When Smoking Low and Slow A common cooking method on a pellet grill is to smoke at low-temperature settings for multiple hours. Thankfully, due to the simple use of electricity and a hopper full of wood pellets, it’s better to leave smoked items at these temperatures unflipped for a faster and more even cook. For instance, a brisket shoulder can sit for over 10 hours until it’s ready to be pulled off. You might spritz them with apple cider vinegar mid-smoke or wrap them in foil and put them back, but there’s no real need to flip them. These techniques are used to retain moisture and add flavor, not to cook the other side. Flip Meat When Cooking On High Temperatures When cooking items like burgers or searing a steak on a pellet grill, they must be flipped to avoid being overcooked. Grilling at high temperatures, often around 450°F, is a game-changer. Think of preparing a delicate wagyu steak on a Traeger set to High. The heated heat from the smoke rising from the bottom firepot, where the wood pellets burn, creates an intense environment. In this article, you’ll learn how this differs from charcoal or propane grills. Foods cook faster on the top when set to a high temperature, unlike smoking at low temps inside the drum, where the smoky air circulates evenly around all sides of the meat. Flipping must be done, otherwise, your prized cut may burn. Sear Meat at High Temperatures on Pellet Grills Similar to other forms of cooking, grilling meat at high temperatures on pellet grills demands a specific approach, especially for items like steaks that are best when seared. This article explores finding the perfect temperature for searing. It’s advisable to preheat the grill for at least 10 minutes. The internal areas of a pellet grill heat up quickly, making it ideal for searing. Flipping the meat during this process ensures an evenly cooked, perfectly seared exterior. Grill on Pellet Grills with Lid Closed Regardless of whether you choose to flip the meat or not, the lid
Pre-Grill Precision – Timing Your Meat for Delicious Results
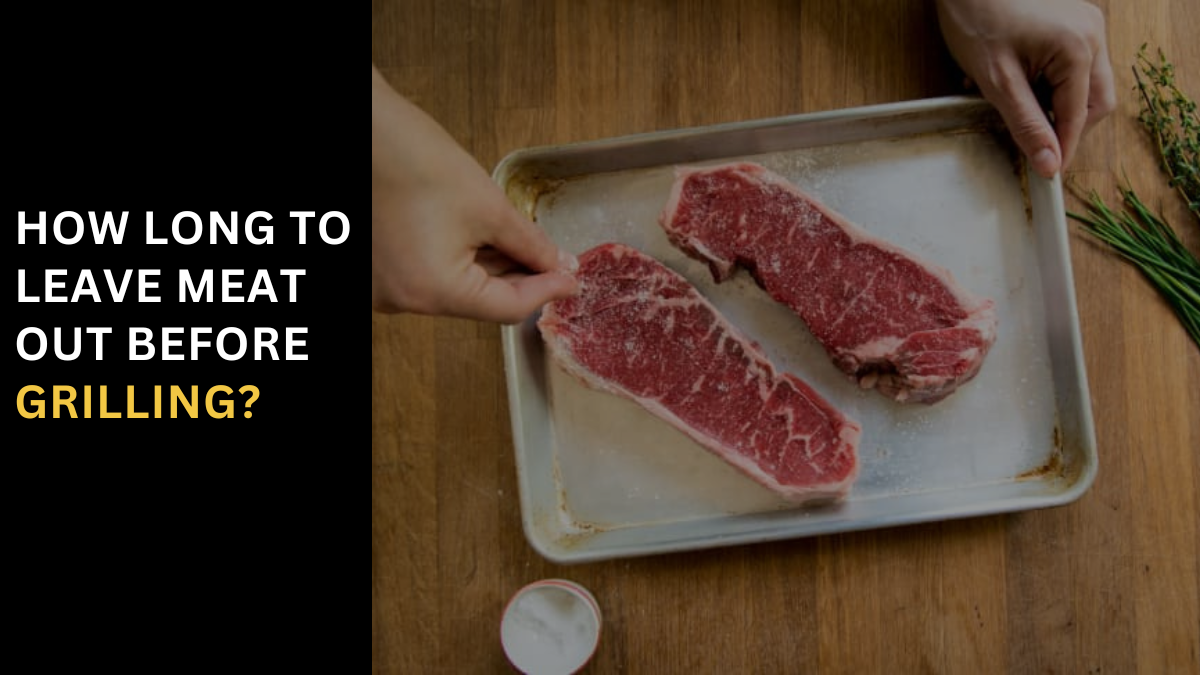
How Long To Leave Meat Out Before Grilling? 4 Mistakes to Avoid When Cooking Steak Cooking a steak at home, whether on the oven, stovetop, or grill, might seem easier than you think, but it’s crucial to start by avoiding some common mistakes. One of my favorite methods includes taking some simple but effective steps every time. 1. Cooking the steak straight from the fridge is an easy misstep. Rather than tossing it onto a hot skillet, plan to take it out and let it sit at room temperature for 30 minutes to an hour. This simple step helps the steak cook more evenly, avoiding the quick, uneven result of a well-cooked outside and an undercooked center. 2. Not seasoning the steak first is another error. Whether you’re cooking a filet or a fatty, full-flavored ribeye, failing to season with salt does a disservice to both flavor and texture. My tip? Don’t be shy; give your steak a whole lot more seasoning than you might think necessary. It helps to create a dry surface that can pick up a better sear. 3. Adding spices too soon to your steak can be detrimental to the flavor, especially with ground pepper or other steak seasoning. It’s best not to add these spices to the meat before it hits the hot skillet as they can burn quickly, reducing the chance for true flavor development. My follow-up tip is this: If you’re sprinkling on other seasonings, you must wait until the steak comes off the heat. This allows the seasonings to work their way deep into the meat, giving an extra punch of flavor with every bite. 4. Keeping the heat too low while cooking a steak is a common error. A cooked steak’s universal trait should include a deep sear and a great crust on the outside. To achieve this, your skillet or grill must be hot enough. Here’s a tip: You’ll want to crank the heat. Whether it’s your oven, grill, or stovetop, having a High temperature is essential for creating that perfect sear. Plan to use your broiler on high for a few minutes before adding the meat to the pan. The Key to Juicy, Perfectly Cooked Meat? Let It Sit Out In the world of food and its phobias like allium phobia (a term I stumbled upon in a Google search), the fear of leaving raw meat out at room temperature before cooking seems quite shocking to some people. They might freak out as if seeing chicken out of the fridge requires hazmat suits. However, I’m here to reassure raw meat probes that with good, decent quality meat and practicing food safety and common sense, letting a piece of protein—whether it’s roasts or fish fillets—chill at room temperature can produce a juicier, evenly cooked result. When it comes to quick-searing a relatively thin cut of meat Regarding quick-searing a thin cut of meat, like a steak, understanding the difference between a cold center and one brought to room temperature is key. For thick cuts, such as a big chop, or when roasting whole animals like chicken or turkey, tempering the meat to room temperature makes a big difference. It’s basic logic: a tempered piece of meat will cook more evenly from the inside. This is particularly important for maintaining the correct internal temperature—135° for and 160° for poultry. Meat cooked in a 325°-oven that’s been tempered ensures the thickest part, like the breast, reaches the ideal temperature before the closer surface areas overcook, leading to even cooking and less moisture loss, hence, a juicier outcome. For those who love quick-searing a thin cut of meat, like a steak, it might sound crazy to wait hours for the meat to reach the perfect tempering temperature of 72°. However, taking the internal temperature into account before you start cooking is crucial. The long time it takes to bring the meat up to room temperature after taking it out of the fridge is indeed worth the wait. When you let the meat start tempering for enough time, you have a better chance of searing something like a chop perfectly. It’s essential to thoroughly pat the meat dry to develop a browning on the surface much faster. Let’s just be clear: Let’s just be clear: I’m not saying to leave your chops on the table, under the sun, for hours. Rather, I advocate for smart food safety practices when handling raw meat to prevent food-borne illness. This includes washing hands both before and after handling the meat, avoiding cross-contamination on cutting boards, using designated tongs that haven’t touched other ingredients, and thoroughly washing all utensils first. Get a good, instant-read thermometer to ensure your meat is cooked to the right temperature. And take deep breaths; don’t panic. Remember, cooking shouldn’t involve a hazmat suit. Top Grilling Tips Befriend your butcher. Buy good quality meat from a shop or supermarket meat counter and Avoid prepackaged steaks in plastic wrap which traps moisture. Look for marbling. Those Thin, white streaks of fat make your steak more juicy and add flavor. Warm up your meat. Take it out of the fridge 30 minutes before grilling to reach room temperature; freezing-cold meat won’t cook evenly. Pare down your tools. You don’t need elaborate equipment for a tasty grill; a solid pair of tongs and a brush will do. Give your grill time to preheat until it’s hot. You should be able to hold your hand over the grates for only a few seconds. Don’t move the meat around. Let the steak develop a seared crust before moving or flipping it. Use the touch test to Check for doneness. A tool as simple as your finger can tell if it’s rare (soft and spongy), medium (springs back when pressed), or well-done (firm). Let it rest. Once off the grill, wait a few minutes before slicing to let the juices settle back into the meat. Conclusion In conclusion, the key to perfect grilling starts well before the meat touches
Microwave Magic – Grilling Meat Like a Pro in Minutes
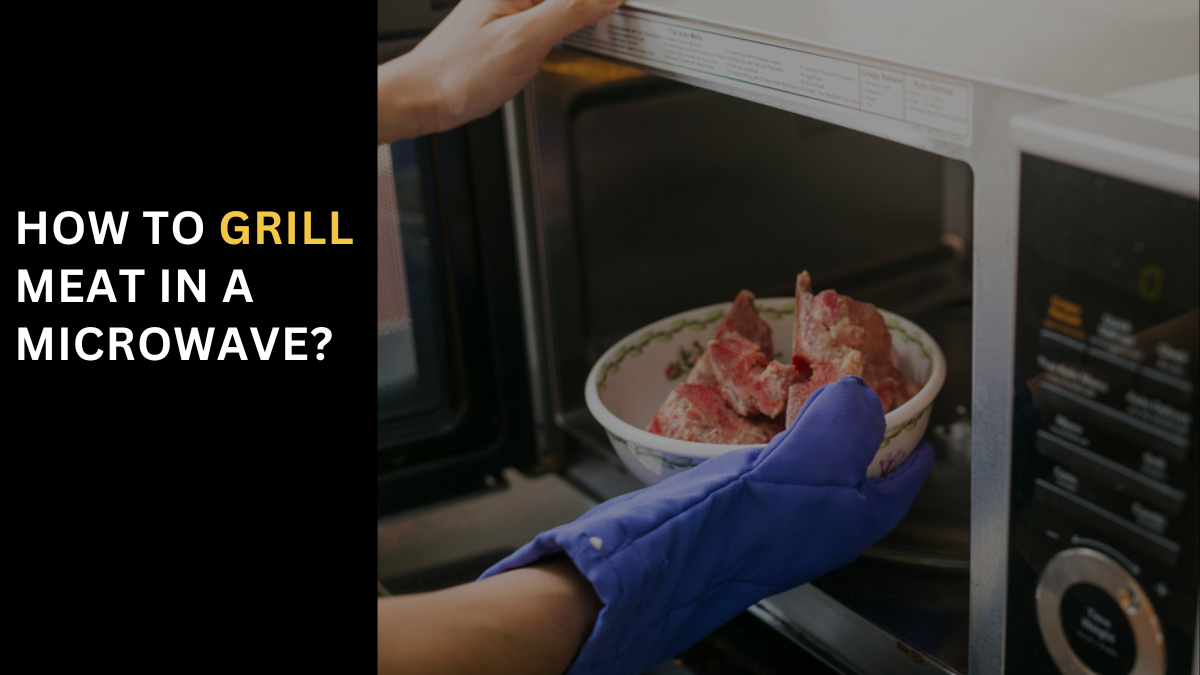
How To Grill Meat in A Microwave? How can I safely cook meat or poultry in the microwave oven? To safely cook meat or poultry in a microwave oven, it’s essential to ensure that all harmful bacteria are eliminated. The key is to reach a uniform internal temperature throughout the food. Due to uneven heating, some spots in the microwave may not cook evenly, so using a food thermometer is crucial for safety. Things Required Grilling meat in a microwave oven may sound unconventional, but with the right tools, it’s quite achievable. You’ll need a microwave grill pan for a start. This specialty item is designed to mimic the grilling effect of an outdoor grill. Using a non-stick spray on the pan prevents the meat, such as steaks, from sticking and helps in even cooking. A crucial tool in this process is a meat thermometer. It ensures that your steak reaches the desired internal temperature for both safety and your preferred level of doneness. This method is perfect for those who want a grilled steak dinner but may only have access to microwave ovens or prefer the convenience they offer over traditional grill cooking. STEP1: Preparing the Microwave Grill Pan STEP2: Cooking the Meat STEP3: Testing for Doneness PRO TIP: Ensuring Proper Preheat How to Use a Grill Microwave Using a grill microwave, which is a fairly new appliance, can help you with its specific settings and capabilities tailored for cooking various dishes. Understanding the general process involves addressing some pressing questions about its operation and best practices. What’s a grill microwave? A grill microwave combines the regular features of a microwave with an added grill function. Unlike normal microwaves that heat up and defrost, grill microwaves also allow you to grill foods using the correct settings and included accessories. How does a grill microwave work? A grill microwave works by creating food that’s nice and brown on the outside while it cooks slowly and evenly inside. It radiates heat to simulate a traditional heating element, producing those tasty char marks typically seen in grilled foods. How do I grill veggies in my grill microwave? To grill veggies, Cut them into sizes that you can leave whole or place them chopped on the grill. Spread them directly on the cooking dish for grilling to ensure they cook evenly. Place them directly underneath the grill cover. Select the suitable grill mode, set the controls, and push Start. The exact settings will depend on your microwave, so it’s best to consult your manual for these details. Halfway through, pull out the tray to flip the veggies, and monitor and adjust as necessary to avoid overcooking. What else can I make in my grill microwave? Your grill microwave can be used for more than just meat and veggies. Try making pizza or sandwiches using the grill rack. The heating element in your grill microwave adds textures and char marks to foods, perfect for crispy crusts on bread and bubbling cheese toppings on casseroles. Can I use metal utensils in a grill microwave? Grilling meat in a microwave, particularly in a grill microwave, is an art combined with the science of cooking. The use of metal utensils in this context brings in a layer of complexity. While grill mode settings on some models might accommodate metal, it’s generally safer to opt for materials like plastic, silicon, paper, or wood as your cookware choice. These materials ensure that the cooking element in the microwave functions optimally without any hazards. Conclusion In conclusion, grilling meat in a microwave, whether using a convection mode, a regular microwave, or specifically designed grill functions, offers a modern, efficient, and versatile approach to cooking. This method not only saves time but also ensures even cooking and perfect flavor enhancement. By understanding the nuances of microwave grilling, from choosing the right cookware to ensuring food safety, you can enjoy delicious, perfectly grilled meals right from your kitchen. Whether you’re a seasoned chef or a novice cook, the ability to grill meat in a microwave adds a valuable skill to your culinary repertoire, promising delightful meals with minimal fuss. People also ask Can you cook raw meat in a microwave? For information, cooking Meat in a microwave oven can be done safely, but it requires attention to detail to avoid uneven cooking and cold spots where harmful bacteria can survive. It’s important to cover the food, rotate or stir it once or twice during cooking, and ensure the meat reaches a safe internal temperature. how long to grill chicken in the microwave? The key to perfectly grilled chicken lies in the preparation. Start by making diagonal incisions in the chicken pieces, then marinate them with spices and lemon juice. Refrigerate this marinated chicken for an hour to enhance the flavors. For grilling, place it on a microwave plate and set the time for 9 – 10 mins. Halfway through, brush the chicken with oil and continue to grill for another 15 – 20 mins. This method ensures that the chicken is grilled to perfection, with a delightful texture and flavor. Can we grill chicken in convection mode? Grilling chicken in a microwave convection oven offers a unique twist to traditional cooking methods. In convection mode, the grill mode is a game-changer. Start by lightly brushing each piece of chicken with flavorless oil. Grill for 13 to 15 minutes, then flip the chicken to the other side and continue grilling for another 15 minutes. This technique ensures even grilling and a perfect crust. After grilling, let the chicken rest for 5 minutes to allow the juices to settle. How to use a microwave grill combo? Shifting the focus to convection microwaves, these marvels of technology blend convection cooking with microwave efficiency. They allow you to bake, roast, and grill with near perfection. Unlike OTGs and dedicated ovens, which excel in baking scrumptious cakes and artisan bread, convection microwaves offer versatile grilling capabilities. When using a microwave grill combo, start by placing your
Grill Like a Pro – Secrets to Moist and Tender Meat Every Time
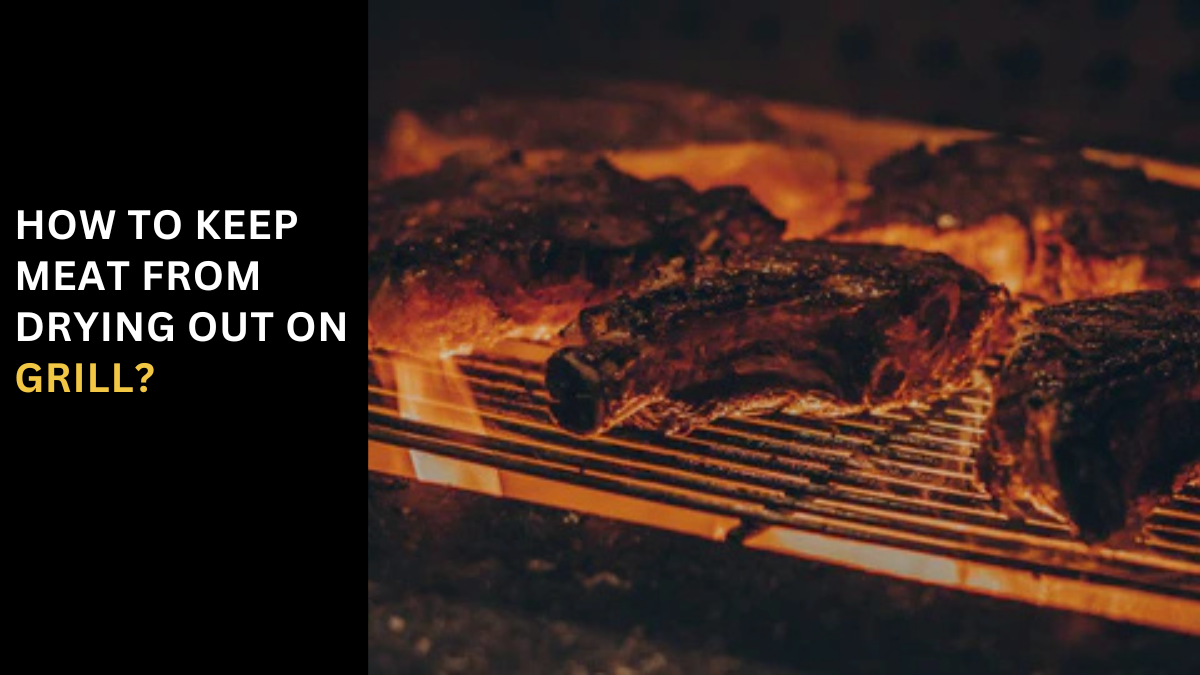
How To Keep Meat From Drying Out on Grill? How to Keep Meat Moist While Smoking: 12 Easy Tips You Can Try When grilling, especially smoking meat, the challenge of keeping it moist and juicy is significant. To prevent drying out, especially in environments with higher altitudes or varied outside humidity like winter weather, the cooker’s temperature and moisture content are crucial. Smokers often struggle with maintaining consistent temperatures and humidity levels, but with the right strategies, you can consistently achieve deliciously moist results. 1 – Carefully Choose Your Cut of Meat Start by selecting a quality cut of meat. While cheap and economical cuts can be smoked, a good lean-to-fat ratio is crucial, as fat holds moisture better than lean. 2 – Salt the Meat First Using Salt to flavor and retain moisture is a key process. It works by denaturing proteins in the meat, helping to maintain the moisture level inside the smoker. Whether you use a dry brine with kosher salt, a salt-based dry rub, or a liquid brine, it’s especially beneficial for leaner cuts, acting as a buffer against the smoke for longer periods. 3 – Inject the Meat For leaner, tougher cuts like beef brisket that tend to dry out, consider using a meat injector. This liquid injection method helps keep the meat moist by injecting a mixture of fats, salt, and seasonings deep into the core. This technique moistens the meat from the inside out, preventing drying during slow smoking over long periods. 4 – Wrap the Meat to Lock In Moisture To ensure moisture is locked in while smoking, wrap your meat in either aluminum foil or pink/peach butcher paper. This prevents moisture from escaping and helps maintain the right temperature throughout your cooking session. Make sure it’s covered without any gaps for steam to escape. Both aluminum and butcher paper are effective; however, butcher paper is more porous, allowing the smoky flavor to permeate the meat. If you don’t wrap during the initial few hours of smoking, it can lead to dryer meat. 5 – Less Charcoal, More Wood While Charcoal is an efficient fuel source for controlling your cooker’s internal temperature, it burns hot. Using too much can raise your smoker’s temperature higher than needed. To prevent this from happening, and keep your meat moist, mix in wood chunks. They impart a delicious, natural wood-smoke flavor and offer better control over the cooking temperature. The “less is more” approach to adding fuel can be key. 6 – Cook With Indirect Heat To master moist smoking, the last thing you want is to cook directly above the fuel source; it’s one of the quickest ways to dry out your meat. Using indirect heat, which involves placing the meat away from the direct heat source, is essential, regardless of the type of smoker you are. This might mean using a couple of racks at the bottom or the side of your smoker. 7 – Properly Control Your Smoker’s Temperature Properly controlling the internal temperature of your cooker is essential for maintaining the desired cooking temperature to keep the meat moist. If the temperature is too high, you risk overcooking; if it drops too low, the meat will not cook properly. Monitoring your smoker’s temperature evenly throughout the cooking process is crucial, especially when smoking meat. Aim to maintain a range of 225 to 245 degrees Fahrenheit. Don’t just rely on the built-in or mounted temperature gauge, as they are rarely correct and don’t account for hotter areas or the temperature sitting near the air vents. Understanding airflow is key—versus electronic controls, be comfortable knowing when to open or close the vents as needed. For a higher temperature, open vents; for a lower temperature, close vents. 8 – Cook With a Pan of Water in Your Smoker Many smokers come with a built-in water pan at the bottom, but if yours doesn’t, it’s not just a manufacturer’s side thought. Using an aluminum pan filled with water on the bottom rack of your vertical smoker or the side of your meat while smoking can make a significant difference. The heat from the cooker will cause the water to evaporate, creating steam to moisten and seal in the internal juices of the meat. 9 – Avoid Too Much Thick Black Smoke When smoking meat, it’s crucial to avoid thick black smoke, which can dry out the meat and overpower its natural flavor. Aim for a thin stream of blue smoke flowing from the chimney, indicating a good, clean-burning fire. Billowing black smoke can replace the desirable wood-smoke flavor with a strong, bitter, and charred taste, often a sign of creosote buildup. If you see too much black smoke, it’s time to replace or adjust your wood to avoid sucking moisture out of your meat. 10 – Spritzing or Baste the Meat While Cooking Spritzing or basting the meat during the smoking process can add flavor to the exterior and help retain moisture. There’s a variety of styles to suit personal preferences; for instance, Carolina-style pitmasters might opt for apple cider vinegar as a spray, while St. Louis-style enthusiasts might prefer brushing with a semi-sweet, tomato-based sauce. Don’t hesitate to experiment with different options, finding the one you love best. 11 – Don’t Keep Opening the Lid For those using smokers, it’s important to fight the urge to keep opening the lid of the smoker to check on the meat. Each time the lid is opened, steam that’s built up is released, losing valuable moisture and causing the meat to dry out faster. Instead of constantly checking, trust in your tools, like a digital meat thermometer, to check the temperature inside without disturbing the cooking environment. 12 – Let the Meat Rest a Little An often overlooked yet important aspect of ensuring a quality cut of meat remains juicy is allowing it to rest after it comes out of the smoker. When done, pull out the meat and let it rest a bit instead of cutting
Stick-Free Grilling – Brief Guide to Perfectly Grilled Meat
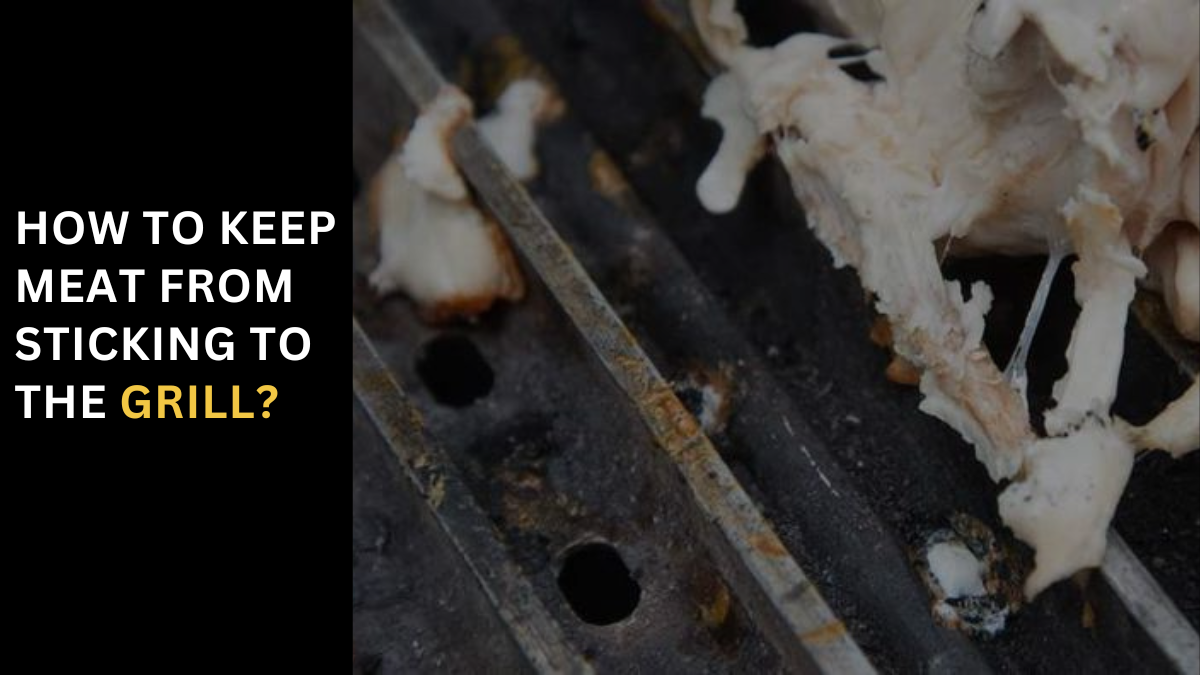
How To Keep Meat From Sticking To The Grill? Why is Food Sticking to the Grill? When it comes to grilling, one common issue many face is food sticking to the grill. This problem can be traced back to three main reasons, each crucial in how your meal turns out. Understanding these can help you better prepare your grill for an optimal cooking experience. The first reason is the grill not being hot enough. Many instances of food sticking occur because the grill hasn’t been preheated to the right temperature. A hot grill helps create a naturally non-stick surface, where the warmth allows the meat to sear quickly, reducing the chances of it sticking. The second reason revolves around the cleanliness of the grill. A dirty grill with leftover residues can act like glue, causing your food to stick. This is why cleaning the grill grates thoroughly before each use is essential. Lastly, the lack of oil on either the food or the grill grates can lead to sticking. How To Keep Food From Sticking To The Grill? Proven Solutions to Stop Food From Sticking to the Grill As a grilling enthusiast, I’ve learned that to stop food from sticking to the grill, it’s essential to prepare correctly and follow a few simple steps to ensure a great meal. Let’s explore these methods, starting with the second topic but keeping the first in mind for a cohesive approach. Make It Hot, Keep It Clean, and Don’t Be Afraid of a Little Oil 1 – Get the Grill Hot The first and foremost step is to heat up the grill for five to 10 minutes before you begin. Starting with a cold grill and cold food is a recipe for a disaster. A grill at the proper temperature allows the food to naturally release from the grates when it’s ready to be flipped or taken off. 2 – Clean the Grill—and Keep It Clean Next, always clean the grill before grilling. Any leftover food from the last time it was used can make your current meal stick. Don’t be lazy to clean after your last cookout session; a little effort here can save a lot of mess later. Heat up the grill and gently scrape it for a few seconds to keep it pristine. 3 – Oil the Thing You’re Grilling and the Grill Finally, the use of oil is crucial. Lightly oil your protein before placing it on the grill and sparingly apply oil to the grates. Use a brush or an old rag with tongs to rub oil on the grates. The only exception might be burgers, which have a higher fat content, but for chicken, fish, or leaner meats, a good rub of oil is beneficial. By focusing on these three key steps – heating the grill, keeping it clean, and using oil appropriately – you can enjoy hassle-free grilling every time. Some Other Tips When it comes to preventing steaks from sticking to the grill, there are a couple of additional methods I’ve found quite effective. Non-Stick Spray Alternatively, you can use a Non-Stick Spray, like PAM or any vegetable oil-based spray. The benefit here is the convenience of a spray bottle. But, keep in mind, that it’s only safe to apply before lighting your grill, as these sprays can be flammable on a hot grill. Misuse could turn your backyard barbecue into a fire hazard. Aluminum Foil Another method is using Aluminum Foil. Simply place your steaks on a piece of foil on the grill grate. While your Meat won’t stick, a problem with this method is that it lacks the distinct, smokey, charred flavor you get from grilling directly on the grates. By integrating these techniques into your grilling routine, you can enjoy stick-free, flavorful steaks every time. Easy Steps to Accomplish a Clean Grill in Minutes Keeping your grill clean and ready for the next time you use it is simpler than it seems. By following three easy steps, you can accomplish a pristine grill in just minutes. Let me explain how I ensure my grill is clean and ready right before every use. STEP 1: Assemble Followings Firstly, assemble all your supplies. You’ll need cooking oil (I prefer canola oil due to its high heat tolerance), a small bowl, paper towels, and one or two sturdy grill brushes. The Grill Wizard Brush and 16″ locking tongs are my go-to for grilling. STEP 2: Heat the Grill Heat the grill until it’s screaming hot. For a gas grill, turn it to high and close the lid to let it heat for 10-15 minutes. The photo on the left shows a cold, dirty grill with food remnants from the last time it was used, while the one on the right shows it heating up. The residue will blacken and turn to ash, making it helpful to scrape off the charred food ashes. This makes it easier to release any stuck-on food. STEP 3: Use a Grill Brush to Scrape the Burnt Food from the Grill Finally, use a grill brush to scrape any burnt food from the grill. A Brillo pad or scrubby also cleans the grill grates effectively with a bit of elbow grease. It only takes a few seconds, seriously. Step 4: Season the Grill Grates with Oil Season your grill grates with oil to create a non-stick surface. Use a wad of paper towel, held with tongs, and pour a small amount of oil into a bowl. Dip the end of the towel in the oil until it’s saturated but not dripping, as excess oil can cause flame up on a hot grill. Step 5: Quickly Drag the Oily End of the Paper Towel Over the Grill Grates Quickly (to avoid the paper towel from burning), drag the oily end of the paper towel over the grill grates. This creates a shiny, heat-treated non-stick surface on the grates, ensuring that your food won’t stick when you add it. Step 6: Close